Linking more than one Jira issue to a single CRM Record
In order to store Jira data from multiple issues in a single CRM record, (a Case record for example), the plugin needs a place in CRM where it can write Jira data for an indefinite number of issues and also avoid overwriting values from one issue with data from another issue and keeping the Jira data grouped by issue. The way we accomplish this is to create a custom entity in CRM which has a "parent-child" (N:1) relationship with Cases or whatever record type is being linked directly to JIRA. Just like you can have multiple comments for a Case, you will be able to have multiple JIRA issues for a Case. Each record in this custom entity will hold data from one JIRA issue. You create a field in this custom entity for each JIRA field whose value you want to copy from Jira.
Note: To link multiple Jira issues to a single CRM record other than a Case record you will need to be using version 7.1.2 or later of the CRM plugin.
After configuring CRM and the plugin as described here you can then link multiple existing Jira issues to the same CRM record in one of two ways. From CRM use a "Link to existing JIRA issue" button on the CRM screen or from Jira edit or create a Jira issue and use the plugin's Case field to find and link the issue to a CRM Case.
You can also create additional new issues in Jira from CRM by adding the argument "_always_create" to the URL of any "Create Jira" custom button you are using in CRM. These new issues in Jira will be added to the list of Jira issues linked to the single CRM record.
Creating new issues in Jira from CRM continues to work as before, either via a custom button in CRM to invoke the plugin's create-issue servlet or by enabling the plugin's Cron Service in Jira.
Steps for creating a custom entity in Dynamics CRM
-
Sign into Dynamics 365 and navigate to Settings > Customizations > Customize the System
-
In the Components list, select Entities, and then click New
-
Fill in the Display Name and Plural Name with values of your choice, something like "Jira Issue" and "Jira Issues"
-
Let the Name field default to a value, for our example it would be "new_jiraissue"
-
Optionally you can enter a Description, for example "Issues in Jira linked to this Case"
-
Enable the setting labeled "Notes (includes attachments)" if you plan to copy comments or attachments from Jira to CRM
-
Click the Save icon at the top of the screen to finish
You must now create at least two new fields in your custom entity, one to hold the key for issues in Jira and one to link to our parent object, for this example that will be Cases
-
You should still be in the same window as before, click Fields in the left-hand rail and you'll see a list of predefined fields that have already been created for your entity
-
Click New, set Display Name to "Key" and click Save and Close
-
Click New, set Display Name to "Parent", set Data Type to "Lookup" and set Target Record Type to "Case" (or whatever type of record you are linking to Jira). Click Save and Close
You can now repeat the same steps to create other fields that will hold values from Jira issue fields, for example "description", "status", etc. Most of these fields will be of type Text, make sure you make them of sufficient length to hold the values they will get from Jira.
You should now modify the Dynamics CRM Form used to display Case records so it includes the records that the plugin will create in our new custom entity.
-
In the left-hand rail, select Components → Entities → Case → Forms
-
Click the name of the appropriate form, probably "Case"
-
Click Case Relationships in the left-hand rail to navigate to that section of the form
-
Select the Insert tab at the top of the window and select Control → Sub-Grid
-
Set the Name field to anything you like, perhaps "Jira_Issues"
-
Set the Label field to something like "Jira Issues" and check the option labeled "Display label on the Form"
-
Set Entity to "Jira Issues (Parent)"
-
Click the OK button to close the window
-
Switch back to the HOME tab and click Save and Close
-
Click Publish or Publish All Customizations at the top of the window to complete your customizations. You can now close the Solution window
When viewing Cases in CRM, you should now see a new section labeled Jira Issues, after you complete the plugin configuration changes described below, the Jira Issues linked to a Case will be listed here.
The final step in Dynamics is to update the privileges so the plugin is able to read and write data in your new custom entity.
When you initially set up the CRM Plugin you created an application user and a security role for that user (described here) so that the CRM Plugin could access the data it needed in CRM. You now need to edit that security role to add access to your new custom entity.
-
Log into Dynamics CRM using an account with admin privileges
-
Go to Settings → Security and click the "Security Roles" feature to get a screen listing current security roles
-
Find and click on the security role for the CRM Plugin (it's probably named something like "CRM Plugin")
-
Click on the "Custom Entities" tab and scroll down to find the custom entity you just created (i.e. "Jira Issues")
-
Enable all the privileges and click "Save and Close"
Configuring the plugin in Jira
-
In Jira, on the plugin's "CRM Record Definitions" setup screen, edit the record definition for the CRM parent entity, this is usually the "case" record. Set the field labeled "CRM Child Object" to the name of the custom entity you created to hold the issue data from Jira . Note this entity name will usually have a prefix of "new_", for example "new_jiraissue".
-
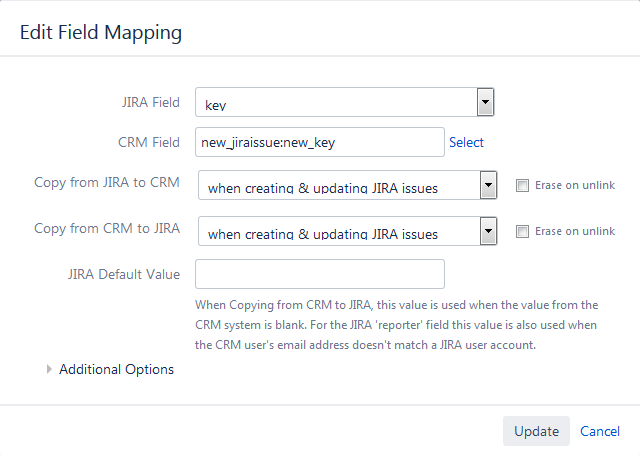
On the plugin's "JIRA/CRM Field Mappings" setup screen, the Jira "key" field must be mapped to "CUSTOM_ENTITY_NAME:new_key". For example, if my CRM custom entity has an Object Name of "new_jiraissue" then I would map the Jira "key" field to the CRM field "new_jiraissue:new_key". Make sure the field mapping for the Jira "key" field is set to always copy from CRM to Jira and to always copy from Jira to CRM.
To map other Jira fields to the custom entity fields, use the following format for the CRM Field name
CUSTOM_ENTITY_NAME:FIELD_NAME
For example, you will probably want to create a field mapping to copy the Jira field "summary" to the CRM field "new_jiraissue:new_name".
Comments and Attachments
In the default configuration where one Jira issue is linked to one case record, comments and attachments are copied to and from the Case record. When using the setup described here, Comments and Attachments are handled differently, they are instead copied to the CRM custom entity record.
From the settings on the plugin's "CRM Record Definitions" setup screen you can control which CRM comments and attachments are copied to Jira. You may choose to have them copied from the parent CRM record, the child object record or from both.