Linking more than one JIRA issue to a single Salesforce Record
In order to store JIRA data from multiple issues in a single Saleforce record, (a Case record for example), the plugin needs a place in Salesforce where it can write JIRA data for an indefinite number of issues and also avoid overwriting values from one issue with data from another issue and keeping the JIRA data grouped by issue. The way we accomplish this is to create a custom object in Salesforce which has a "parent-child" relationship with Cases or whatever record type is being linked directly to JIRA. Just like you can have multiple comments for a Case, you can have multiple JIRA issues for a Case. Each record in this custom object will hold data from one JIRA issue. You create a field in this custom object for each JIRA field whose value you want to copy from JIRA.
Note: To link multiple JIRA issues to a single CRM record other than a Case record you will need to be using version 6.0.3 or later of the CRM plugin.
After configuring CRM and the plugin as described here you can then link multiple existing JIRA issues to the same Salesforce record in one of two ways. From Salesforce use a "Link to existing JIRA issue" button on the CRM screen or from JIRA edit or create a JIRA issue and use the plugin's Case field to find and link the issue to a Salesforce Case.
You can also create additional new issues in Jira from CRM by adding the argument "_always_create" to the URL of any "Create Jira" custom button you are using in CRM. These new issues in Jira will be added to the list of Jira issues linked to the single CRM record.
Creating new issues in JIRA from CRM continues to work as before, either via a custom button in CRM to invoke the plugin's create-issue servlet or by enabling the plugin's Cron Service in JIRA.
Steps for creating a custom object in Salesforce
-
Login to salesforce.com (you'll need to use an account with Administrator privileges)
-
Go to "Setup" > "Create" > "Objects"
-
Click the "New Custom Object" button
-
Enter values for "Label" and "Plural Label" (example: "JIRA Issue" and "JIRA Issues")
-
Enter a value for "Object Name". This name (along with a suffix of "__c" will be used in the plugin's "JIRA/CRM Field Mappings" setup.
-
Enter a value for "Record Name". This field will contain the JIRA Issue Key so give it a name like "JIRA Key". Its Data Type should be "Text".
-
Check the box for "Add Notes and Attachments related list to default page layout".
-
Click the "Save" button.
You must now create one or more fields in this object to hold data from JIRA.
At least one field must be created to link records in the custom object you just created to its parent record, follow these steps:
-
In the section labeled "Custom Fields & Relationships", click the "New" button.
-
Select the radio button labeled "Master-Detail Relationship"
-
Click the "Next" button.
-
The "Related To" value should be set to the parent object, for most users this will be "Case".
-
Click the "Next" button
-
If the parent object is Case, the value for "Field Name" MUST BE set to "Case". Use "Parent" for any parent record type other than Case. The value for "Field Label" can be whatever you like.
-
Continue through the remainder of the pages, selecting whatever options you prefer and finally click the "Save" button.
You can now repeat the above steps to create other fields that will be mapped to JIRA issue fields. Most of these fields will be of type Text, make sure you make them of sufficient length for the data they are to contain. The type for the field to hold the JIRA description field should be of type "Long Text Area".
Configuring the plugin in JIRA
(skip the first step here if using a version of the CRM plugin prior to 6.0.3)
-
In JIRA, on the plugin's "CRM Record Definitions" setup screen, edit the record definition for the CRM parent object, this is usually the "case" record. Set the field labeled "CRM Child Object" to the name of the custom object you created to hold the issue data from JIRA. Note this object name will always have a suffix of "__c", for example "JIRA_Issue__c".
-
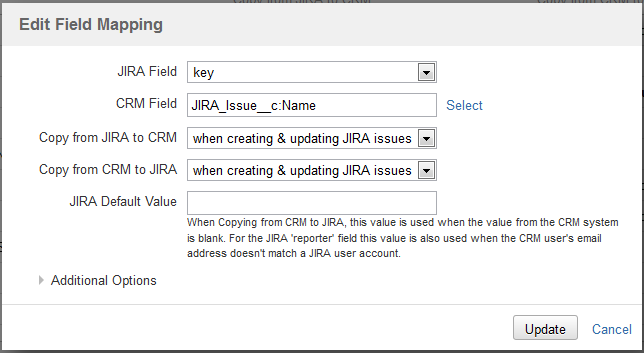
On the plugin's "JIRA/CRM Field Mappings" setup screen, the JIRA "key" field must be mapped to "CUSTOM_OBJ_NAME:Name". For example, if my Salesforce custom object has an Object Name of "JIRA_Issue" then I would map the JIRA "key" field to the CRM field "JIRA_Issue__c:Name". Make sure the field mapping for the JIRA "key" field is set to always copy from CRM to JIRA and to always copy from JIRA to CRM.
To map other JIRA fields to the Custom Object fields, use the following format for the CRM Field name
CUSTOM_OBJ_NAME:FIELD_NAME
For example, to map the JIRA "Status" field to the "Issue_Status" field of my Custom Object "JIRA_Issue" you would use "JIRA_Issue_c:Issue_Status_c" for the CRM Field name.
Comments and Attachments
In the default configuration where one JIRA issue is linked to one case record, comments are copied to and from the "Case Comments" section and Attachments are copied to and from the "Case Attachments" section. When using the setup described here, Comments and Attachments are handled differently, they are instead copied to the Salesforce Custom Object's "Notes & Attachments" section, however for Case records this can be overridden via a setting on the plugin's "Comment Options" screen (see "Always Write to Case Comments").
From the entries on the plugin's "CRM Record Definitions" setup screen you can control which CRM comments and attachments are copied to JIRA. You may choose to have them copied from the parent CRM record, the child object record or from both.