TestRay for Jira Server/Data Center to Cloud Data Migration Guide
Important Notice!
Please make sure you have upgraded to the latest version TestRay Server/Data Center version.
You can find latest version from following page: TestRay Latest Version
This page describes how user can migrate TestRay data from Jira Server/Data Center to Jira Cloud.
If you meet any issues during your migration, please raise a ticket in our support portal, our support team will reach out and assist you as soon as possible.
TestRay Cloud vs. Server/Data Center
As there are big differences between Jira Cloud and Jira Server/DC at the backend and UI. TestRay app needs to be changed/updated in order to fit Jira Cloud.
So, if you are going to migrate from Jira Server/DC to Jira Cloud, you may need to learn the differences between them.
The main logic, workflow and major features of TestRay Cloud are same as Server/DC. But still, there are some differences you can learn from following page: TestRay (formerly synapseRT) Cloud vs. Server/Data Center
Known Limitations in Migration
As TestRay Cloud is a new product which was launched in Atlassian Marketplace from this year. Therefore, some of the features in Server/Data Center are not yet present in TestRay Cloud (e.g. Automation Integration).
Please find the detailed differences between them at TestRay (formerly synapseRT) Cloud vs. Server/Data Center
The most important and key data of TestRay will be migrated to Cloud without any problem (e.g. Test Steps, Test Executions ...). However, some data listed in below table will not be migrated.
# | Area | Summary | Notes |
|---|---|---|---|
1 | Test Case | Test step change history | The feature is yet to be done in Cloud |
2 | Test Case | Inline image inserted to test step | The feature is yet to be done in Cloud |
3 | Test Case | Time tracking values: Estimate, Effort | The feature is yet to be done in Cloud |
4 | Test Case | Test reference value | The feature is yet to be done in Cloud |
5 | Test Cycle | Column configuration setting | It is user setting, it can be created manually after migration |
6 | Test Cycle | Automation job | The feature is yet to be done in Cloud |
7 | Test Suite | Column configuration setting | It is user setting, it can be created manually after migration |
8 | My Settings | Preferences setting | The feature is yet to be done in Cloud |
9 | My Settings | Filters setting | The feature is yet to be done in Cloud |
10 | My Settings | Subscriptions setting | The feature is yet to be done in Cloud |
11 | Automation | Integration settings | The feature is yet to be done in Cloud |
12 | Generate Configuration | Rate Limit | The feature is yet to be done in Cloud |
Jira Cloud Migration Assistant
Atlassian provides the Jira Cloud Migration Assistant (JCMA) to help Jira users assess and migrate from an on-premise Jira instance (Server or Data Center) to Jira Cloud.
TestRay app data migration feature is done together with JCMA tool provide my Atlassian.
Before going any further, check the official Atlassian documentation and procedure:
https://support.atlassian.com/migration/docs/use-the-jira-cloud-migration-assistant-to-migrate/
https://support.atlassian.com/migration/docs/jira-pre-migration-checklist/
Migrate TestRay App Data though JCMA
TestRay data migration from Server/DC to Cloud is executed in two Phases, One phase is at the Jira Server/DC end and the second one is at Jira Cloud end.
As TestRay supports data cross projects, any projects those have data referred from each other, are required to be migrated together within the same migration.
Otherwise, the data references (mainly issue linkages between projects) will be dropped during the migration.
Preparation
Make sure you have the latest version of TestRay app upgraded to your Jira Server/Data Center
We strongly recommend testing the migration process and checking migrated data from a test instance before going to your Jira Cloud production
Please check the official Atlassian documentation and procedure for JCMA: https://support.atlassian.com/migration/docs/use-the-jira-cloud-migration-assistant-to-migrate/
Note
As TestRay supports data connection cross projects, for instance, requirements issues are created in Project A while test case associations are from Project B. So to maintain such linkages, those related projects MUST be migrated together within the same migration, otherwise, those linkages (connections) will be dropped after migration.
Important Notice
If the default name of below TestRay entities have been modified/updated from your Jira Server/Data Center, you need rename them in TestRay Cloud to keep them same before starting migration process. You must do the same if you are using a localized version (e.g. French) of TestRay app in your Jira Server/Data Center.
TestRay issue types: Test Case; Test Plan; Defect and Requirement. You can rename them from: Settings->Issues->Issue types
Test Run Status: Passed, Failed, Blocked, Not Tested, Not Applicable. You can rename them from: Settings->Apps->Test Run Status (only existing ones need to be updated, the rest will be created by migration automatically).
Phase 1: Migrate Data from Jira Server/DC End
Launch 'Migration Assistant home' page by following Atlassian official JCMA documentation, and then do following TestRay app specific settings along with other Atlassian recommended settings.
1. ASSESS YOUR APPS
Set TestRay app as 'Need in cloud':

2. PREPARE YOUR APPS
Make sure TestRay app is installed in destination cloud site:

3. MIGRATE YOUR DATA
Create a new migration.
In 'Choose your migration options' screen, set following:
3.1: Advanced Roadmaps plans (if have): All: 0 plan

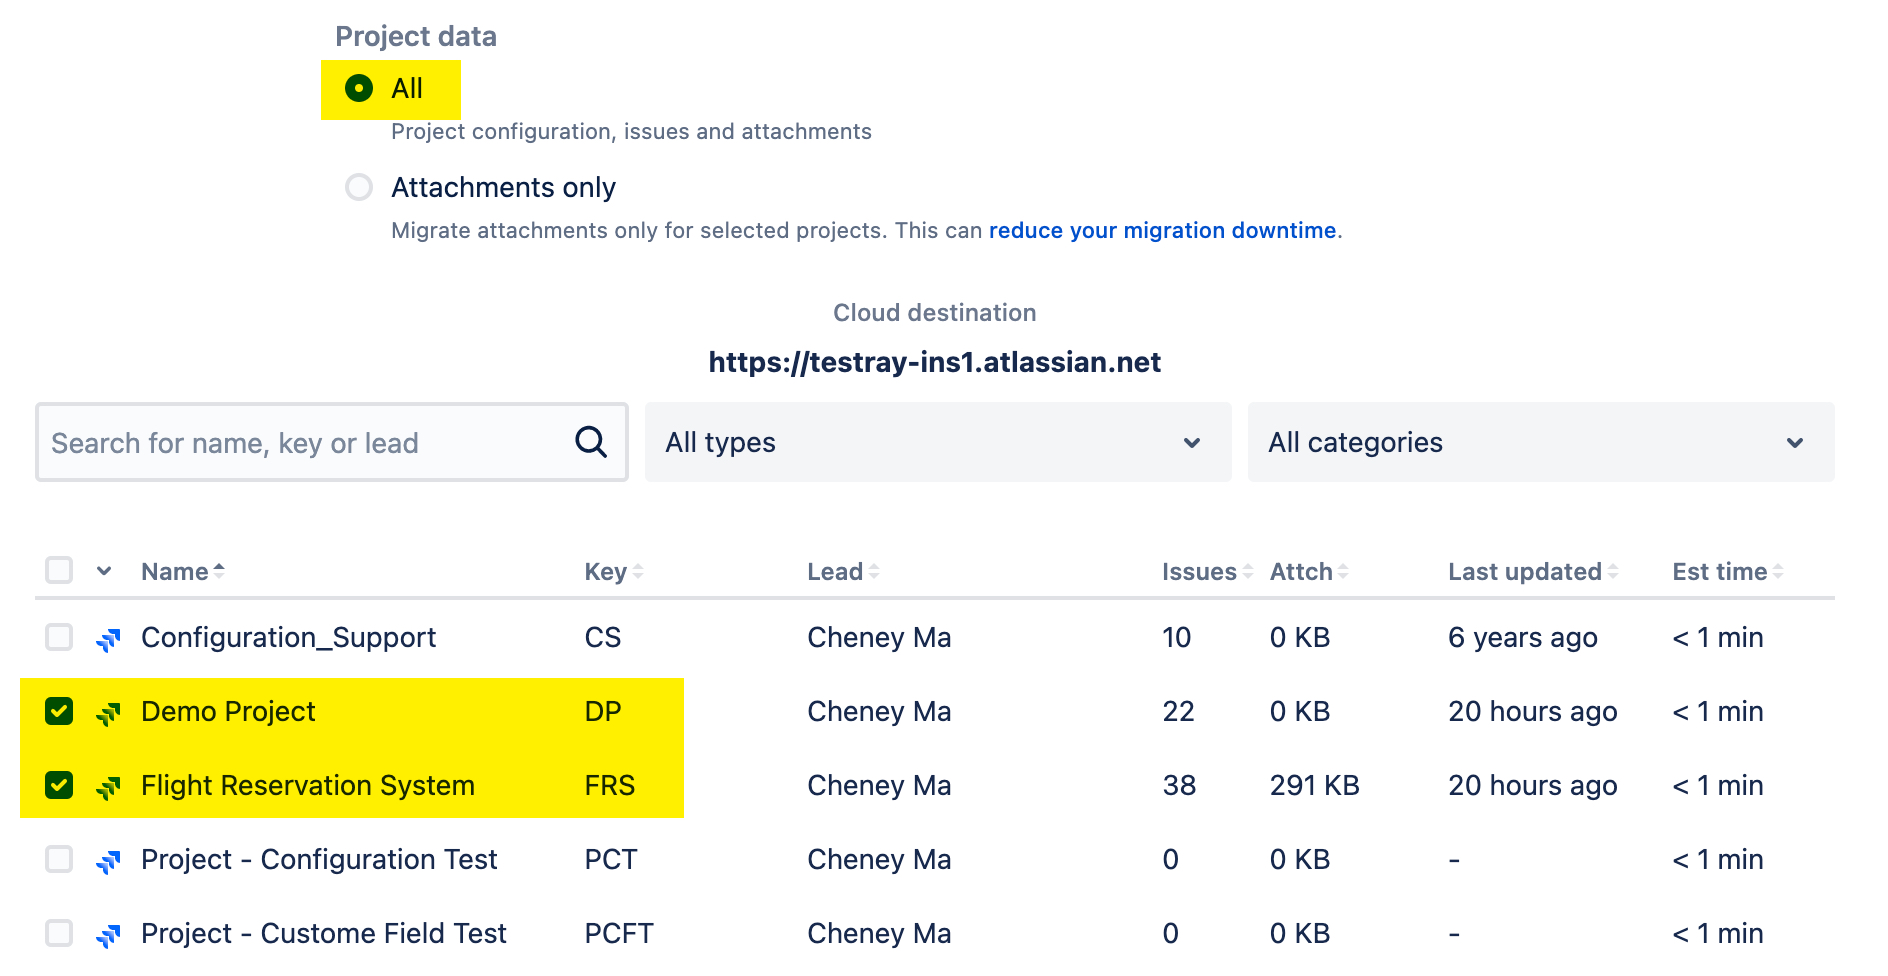
3.2: Projects: Select all intended projects with TestRay app enabled:
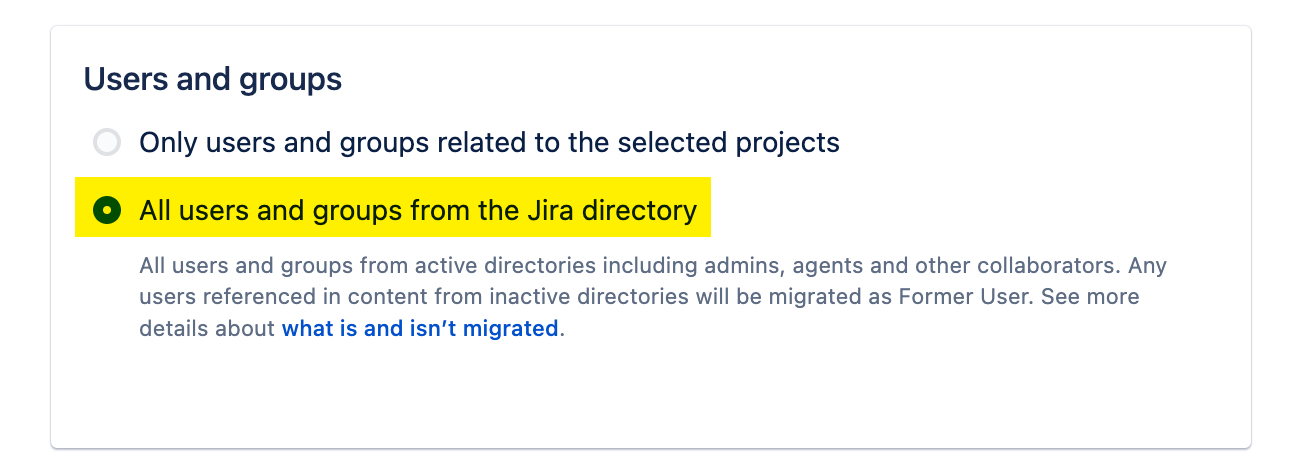
3.3: Users and groups: select 'All users and groups from the Jira directory'
4. RUN MIGRATION
Once above steps are done, RUN the migration, it will takes mins to hours based on how much data you are going to migrate.
Wait until app migration progress reaches between 48% ~ 50% (minimum 48%), you are good to go Phase 2 now.

Phase 2: Migrate Data from Jira Cloud End
Make sure app migration progress reaches 50% before starting following steps.
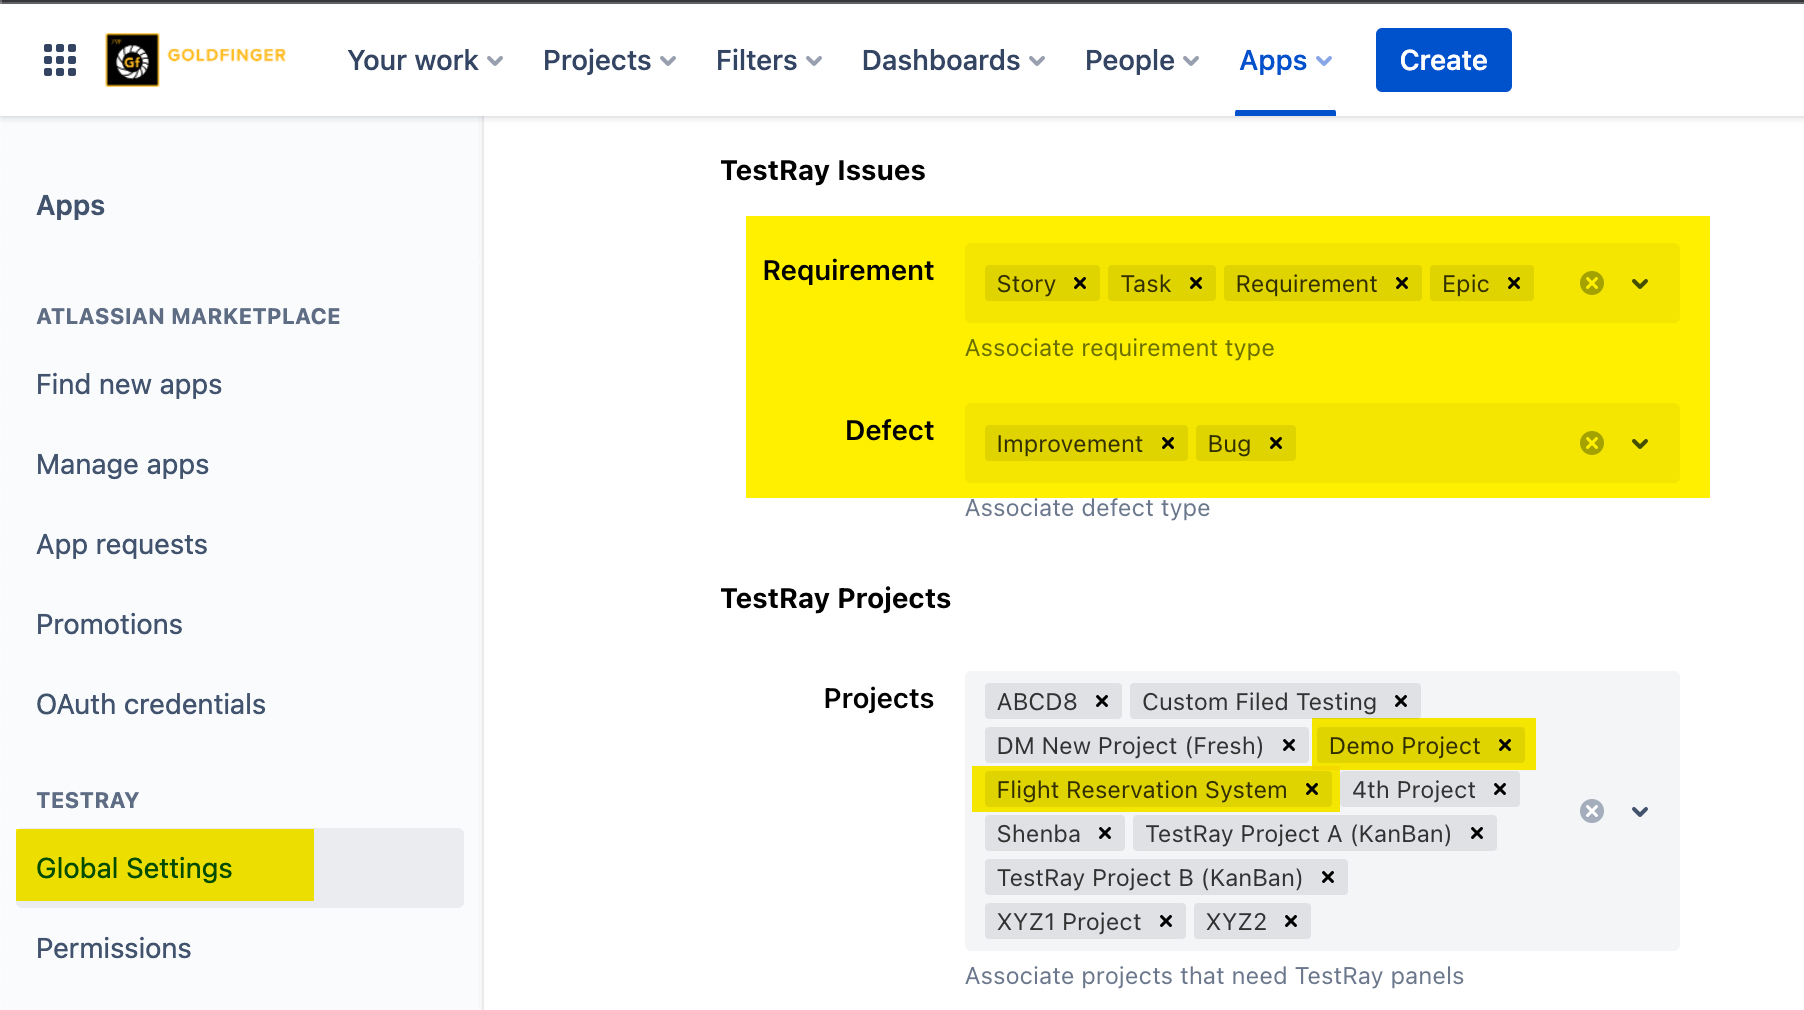
1. Update 'Global Settings'
TestRay Issues: select issue types those are configured for source projects
TestRay Projects: select projects those are migrated from Jira Server/DC in Phase 1, 3.2
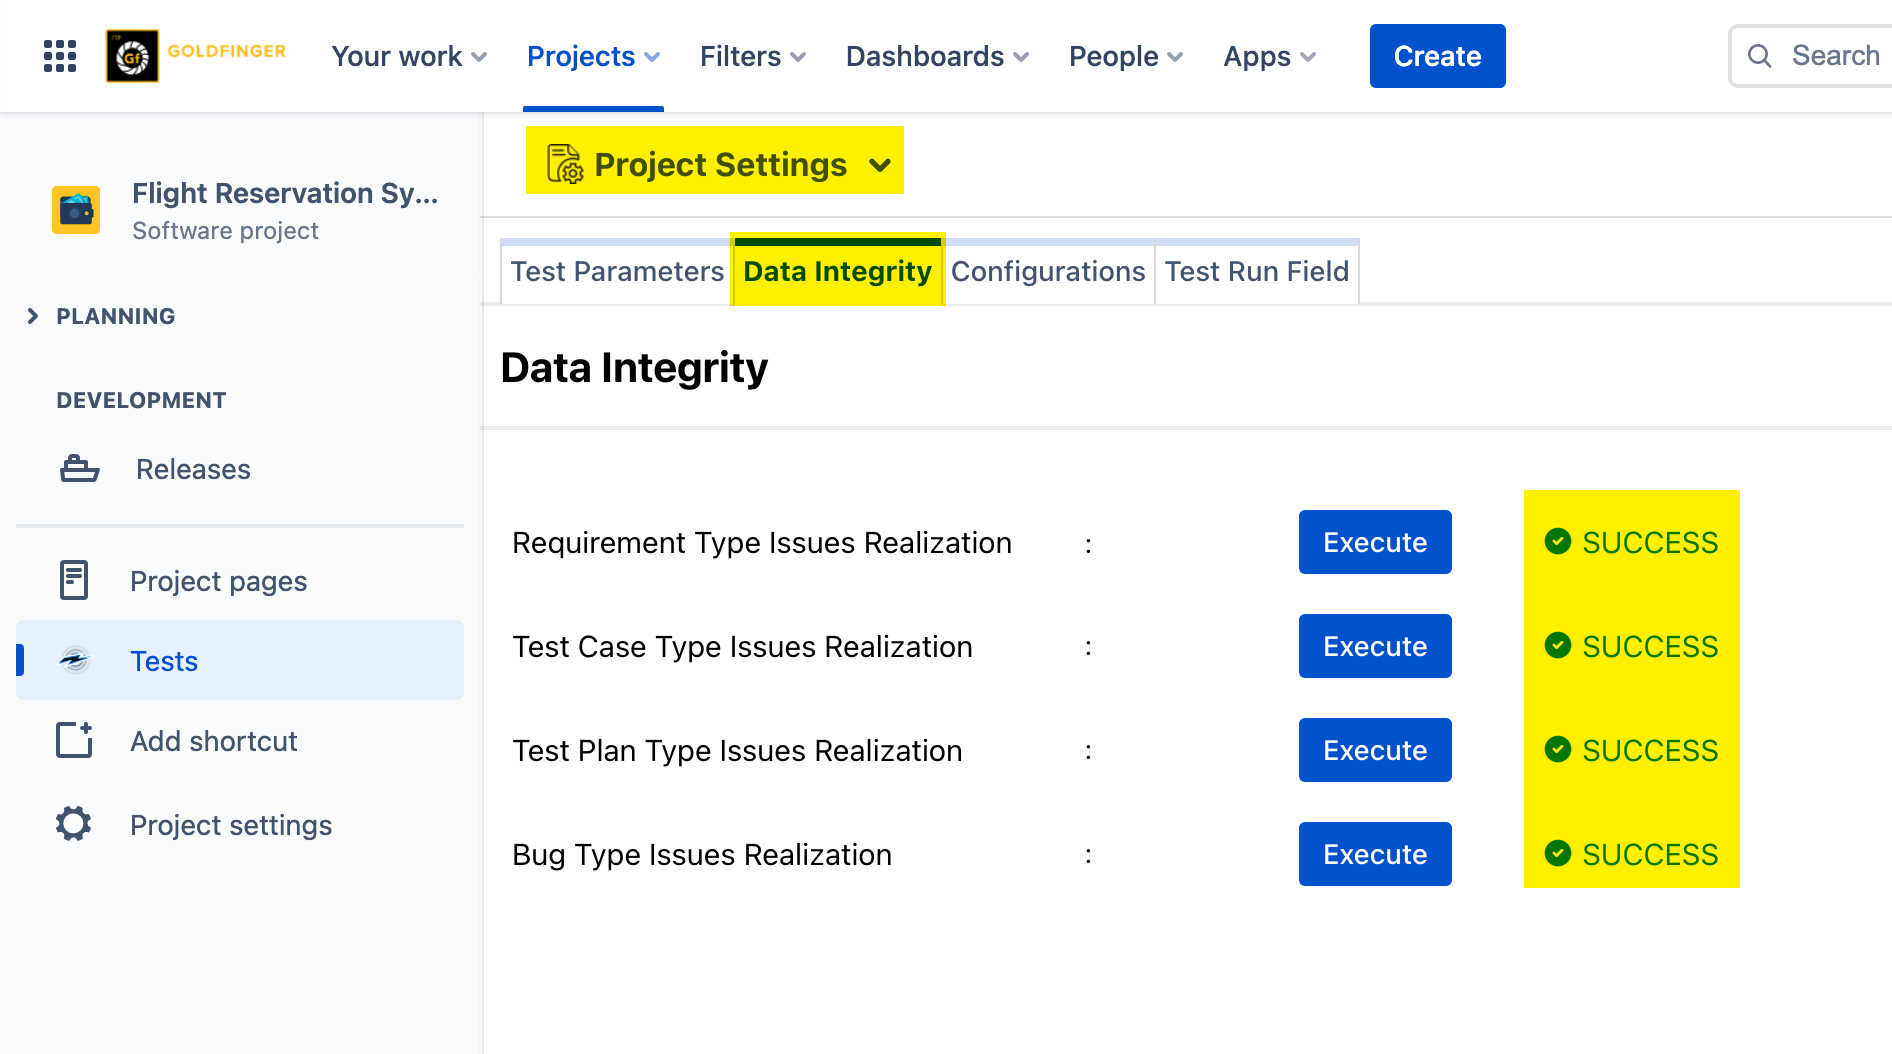
2. Execute 'Data Integrity' check on ALL projects those are migrated
If you have multiple projects migrated, you need do the same for each of them.
3. Execute migration from TestRay 'Data Migration' screen
After migration is started from TestRay Cloud side, you can go back to Jira Server/DC side to check app migration progress.
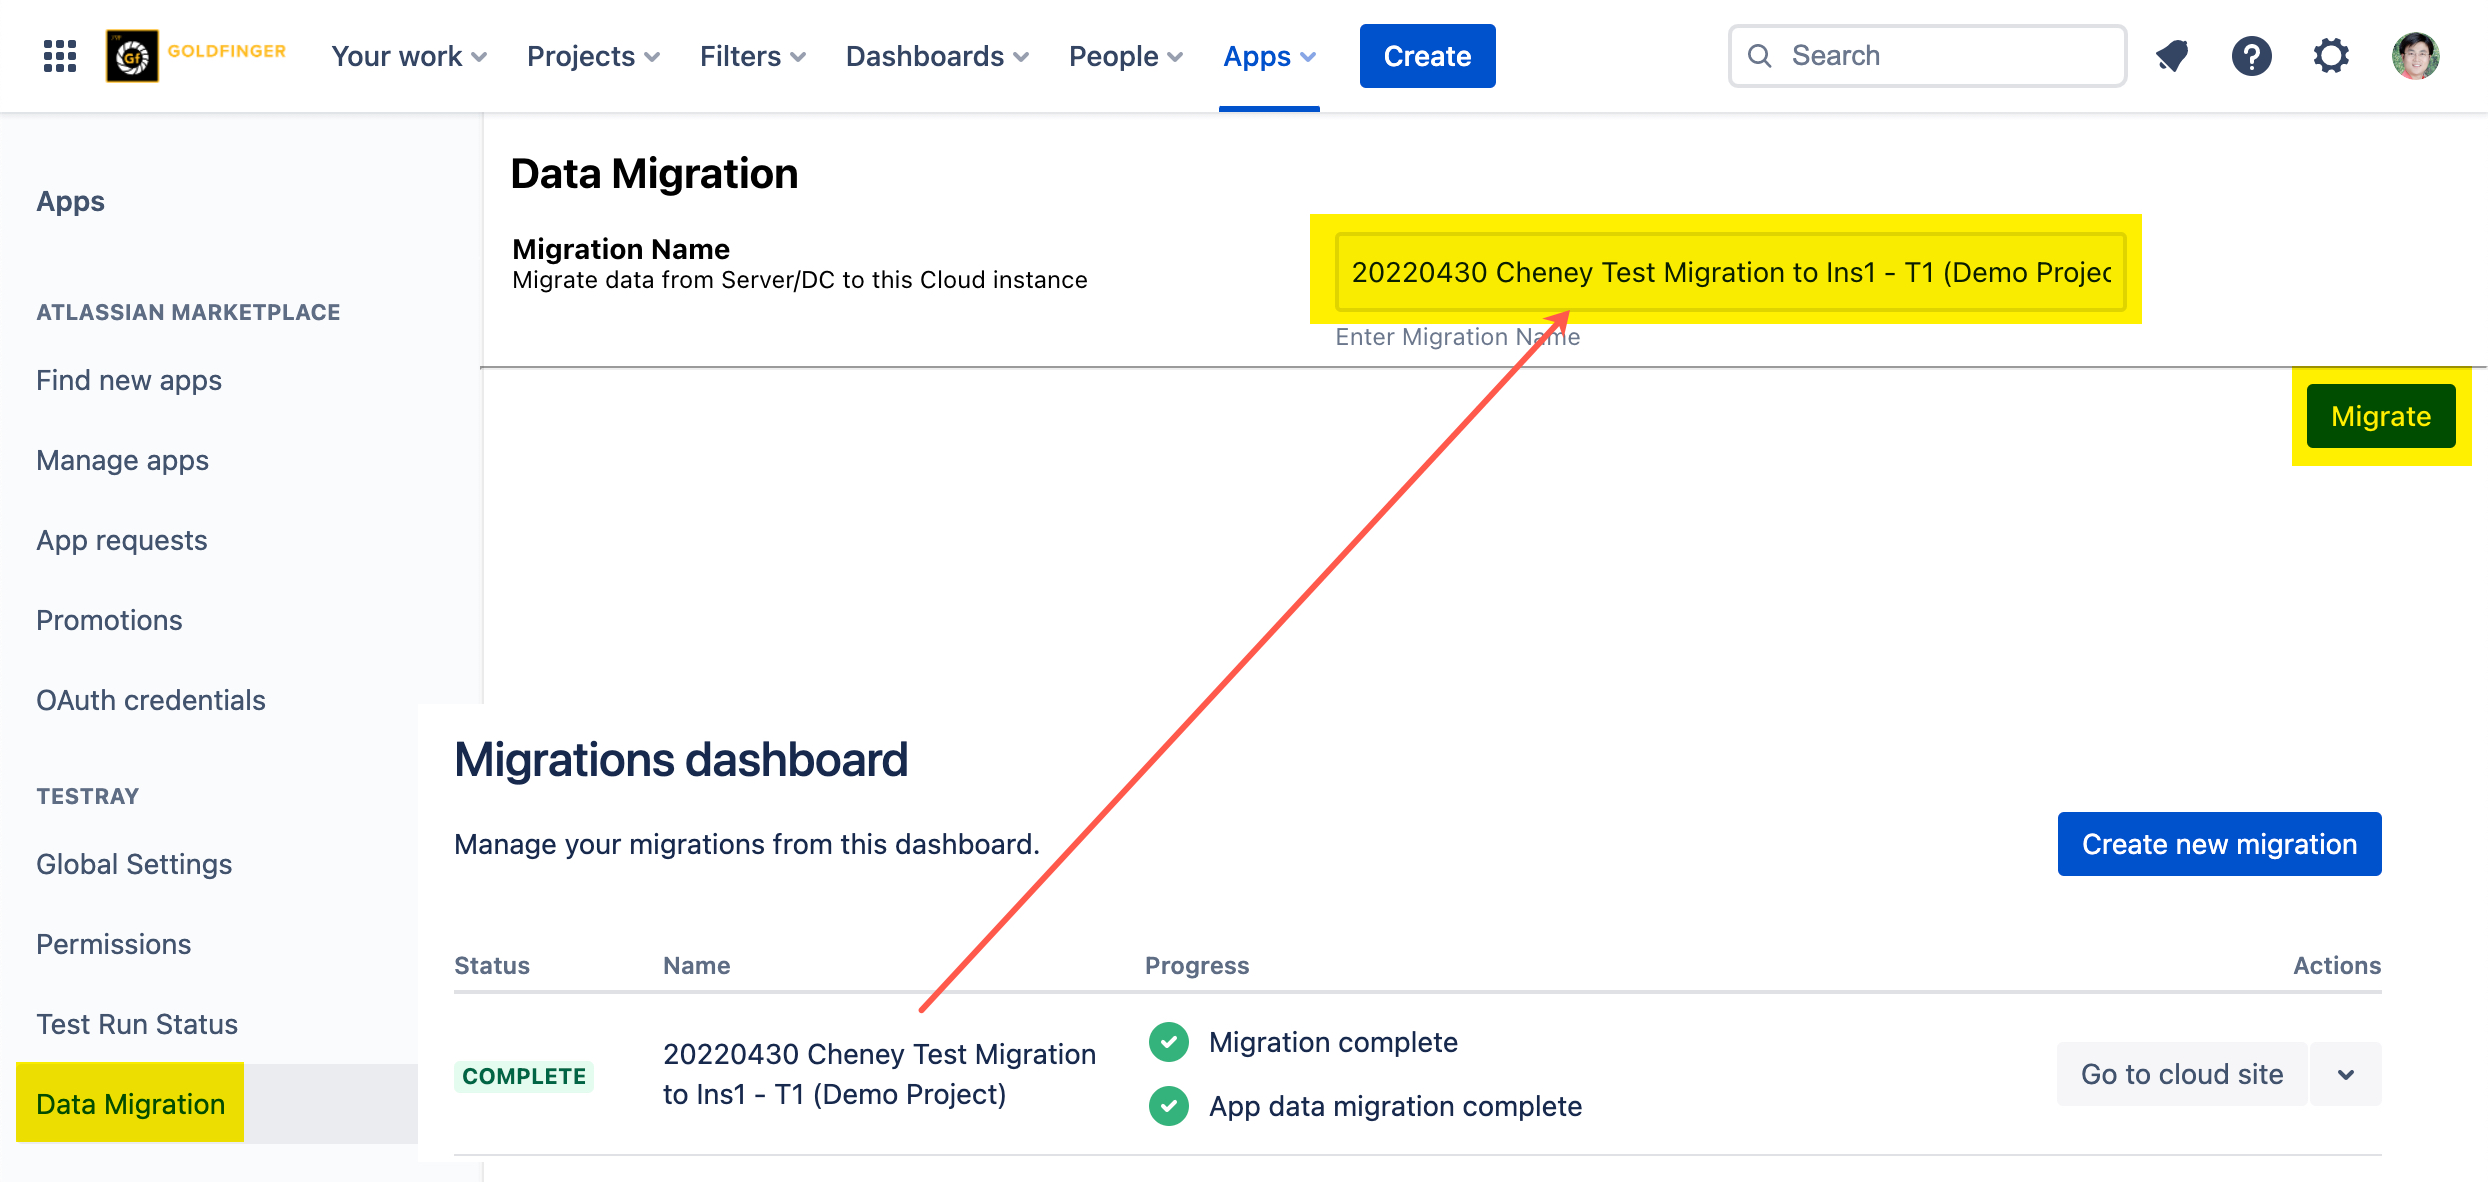
Wait several seconds, then refresh the page from browser, you will see migration progress in the page. If it reaches to 100%, congratulations! You data migration is successfully done!
You can now check the migrated data in your Jira Cloud.
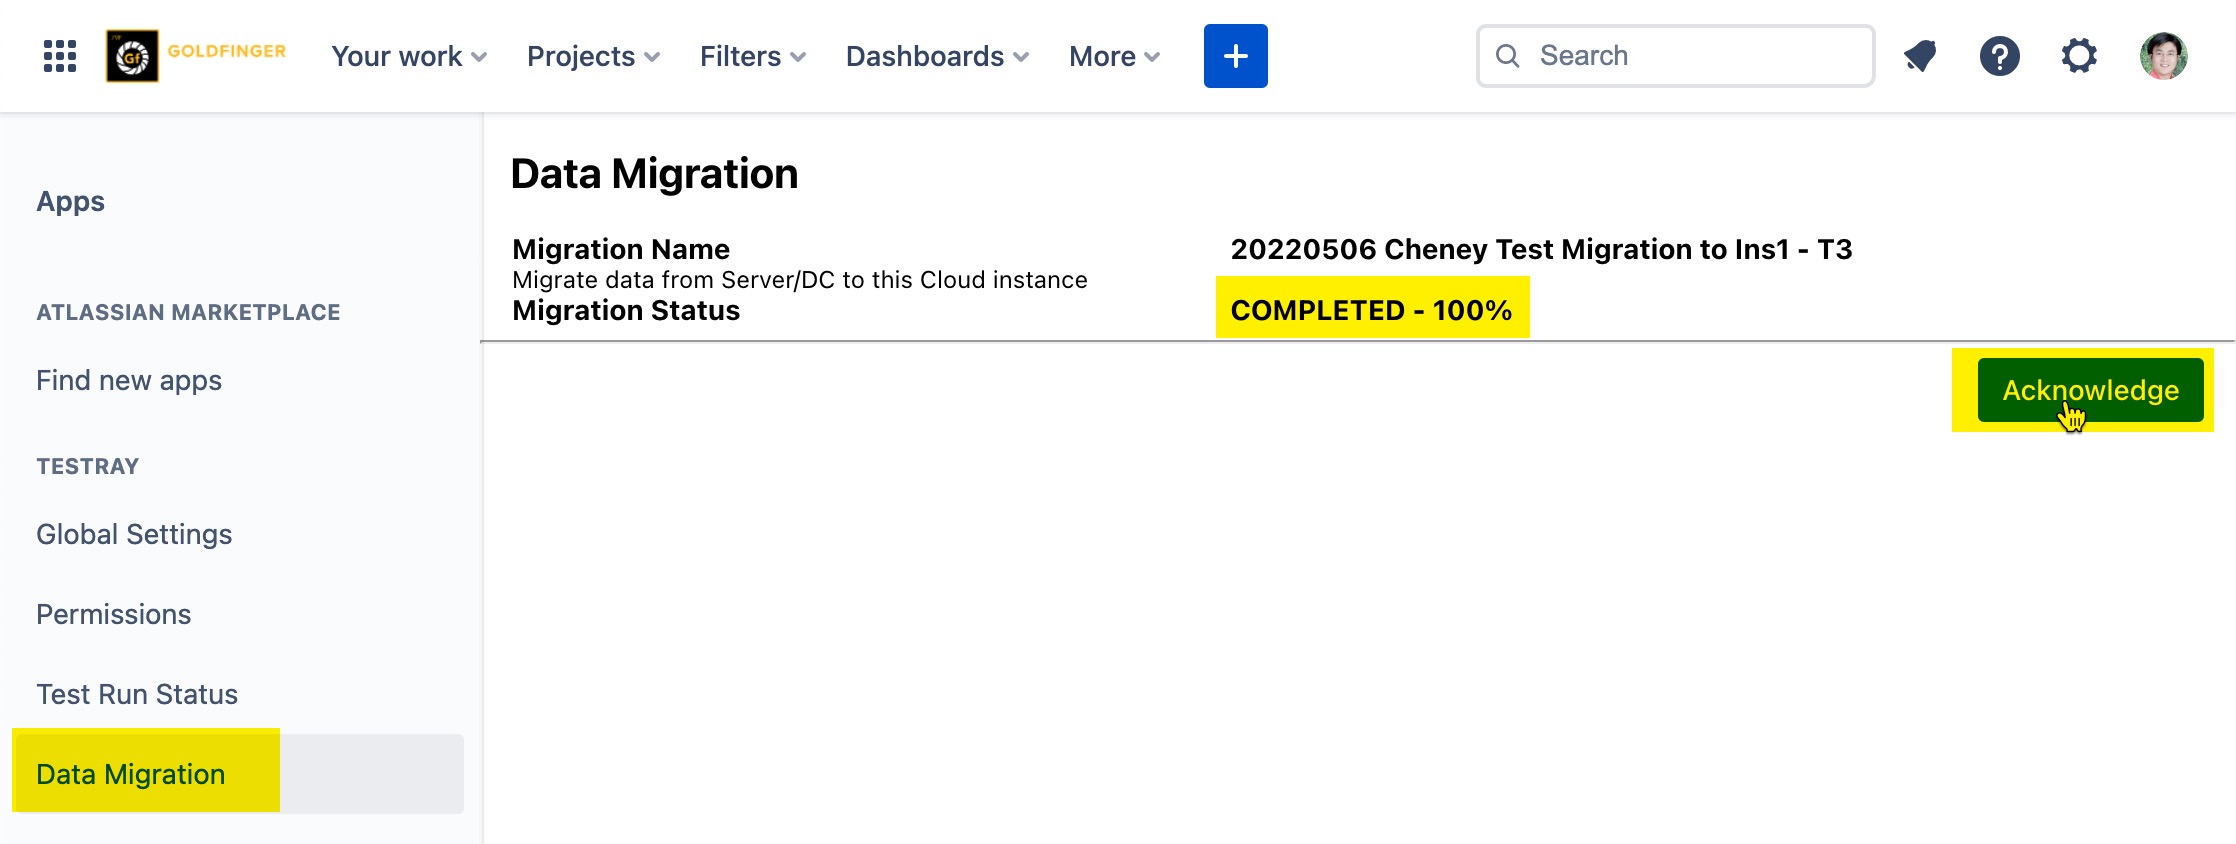
4. Check and confirm migrated data, then click 'Acknowledge' from TestRay 'Data Migration' screen
Unsuccessful Migrations
If the data migration through JCMA is failed due to any reason, we highly recommend you trying it again. As required by JCMA, make sure the corresponding projects are deleted from Jira Cloud. If the issue
persists, please raise a ticket in our support portal, our support team will reach out and assist you as soon as possible.
Temporary Files Created in Jira Server
During the data migration, there are temporary files created in your Jira server. Those files hold all TestRay related data (e.g. Test Runs, Test Steps etc.). We recommend you zip these files and backup them for several weeks, in case to check any data migration issues.
Those files are stored in the following path in your Jira server: <JIRA_HOME>/application-data/jira/export/migration
