Plum-CRM Installation and User Guide
Introduction
The Plum-CRM Application provides tighter collaboration between support teams and sales teams. The CRM Application displays CRM data in Jira issues and Jira data in Salesforce screens, sharing timely knowledge between two otherwise disparate teams, running in a multi-tenant scalable environment that can support all deployed Atlassian customers in a single Kubernetes cluster.
A typical use case is an agent using Salesforce will record a case reported by a customer. To work the case Engineering must get involved so the agent syncs the case to a JIra project. The project manager is notified of the new issue and assigns the work to an engineer. As the engineer works on the issue they may request the agent to get a log file from a customer. Instead of using email or phone to communicate with the agent the engineer will enter a comment in the Jira issue which will appear as a comment in the Salesforce case. When the agent receives the log file from the customer it's attached to the salesforce case, which is synchronized to the Jira issue for use by the engineer. As work progresses status is changed on the Jira issue which is synched to the salesforce case, and when the issue is resolved the agent is notified of the fix which can then be sent on to the end customer.
-
Requirements
-
User with admin access for Jira
-
User with admin access for Salesforce
-
Jira user with permissions to read, update, and delete issues Jira issues (including comments, attachments, and issue links).

Installation
The installation of the application is performed in three steps.
Step 1: Salesforce Installation
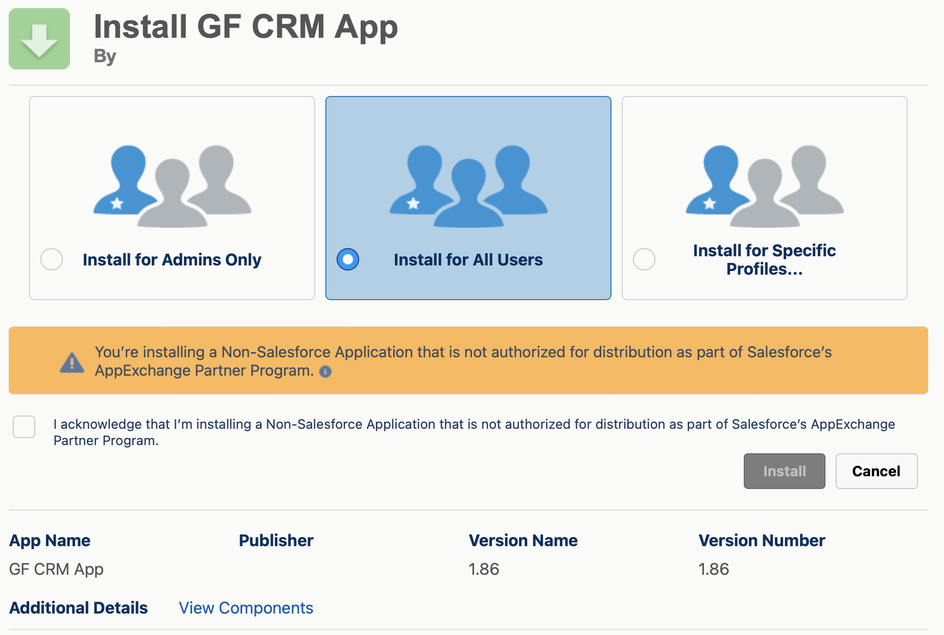
If you don’t have it yet, create a Salesforce Org and make sure that you have admin access. Then install the Salesforce managed package for all users which will install the necessary objects like the triggers and custom fields and screens.
Salesforce Post Installation Steps
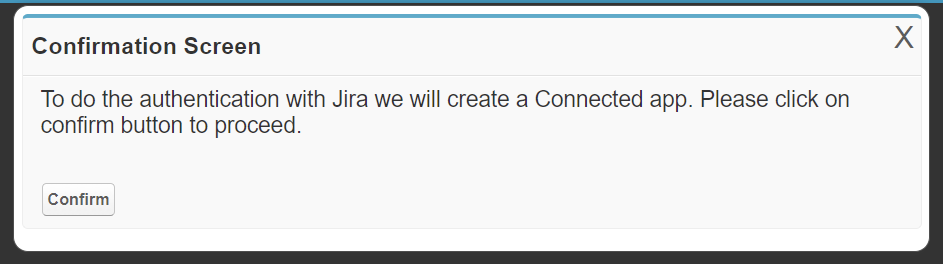
After the package has been installed click on configure for the GF CRM App:
Click on the “Create Connected App” button. This screen will appear. Press the Confirm button.
Step 1a: Adding digital certificate in Connected app
-
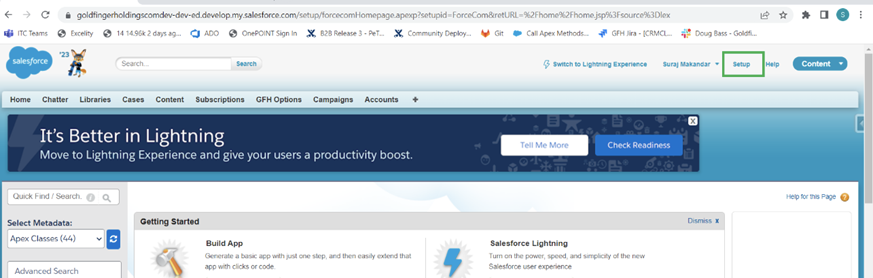
Click on Setup
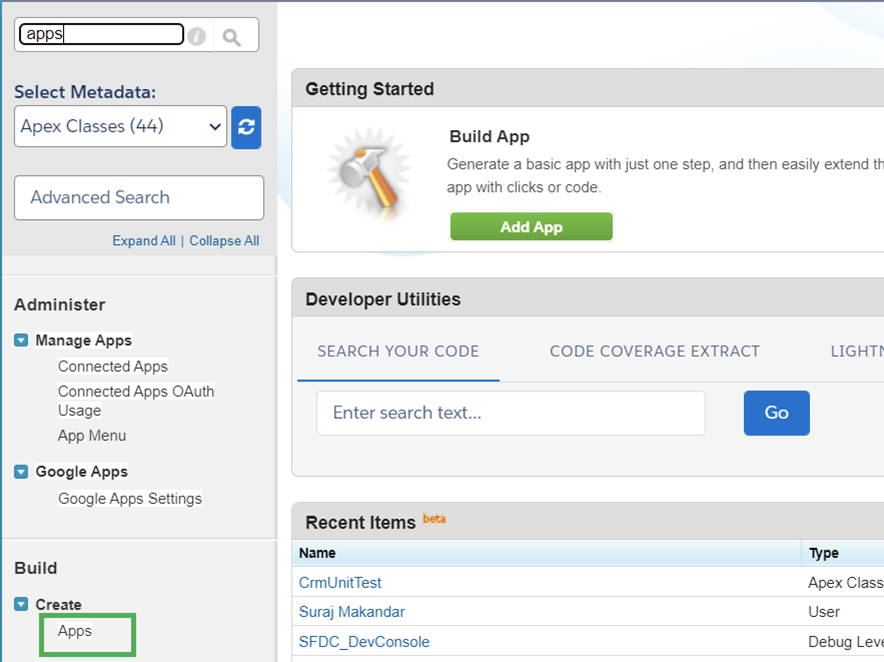
2. Search for Apps
3. Scroll down to Connected Apps section and click on Edit link next to Goldfinger_Holdings connected app

4. Select Use Digital Signatures checkbox from API section
5. Click on Choose file and select the certificate named “prod_server.crt“.
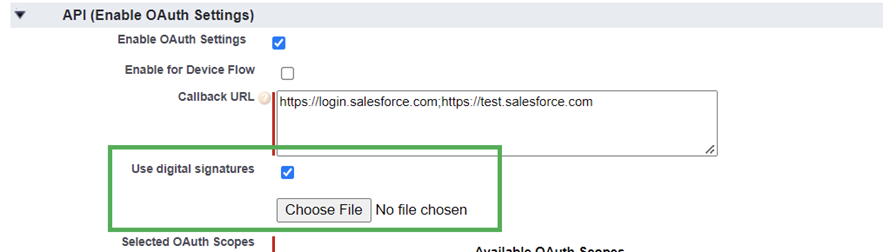
The crt file can be downloaded from the Getting Started tab on the Jira configuration screen by clicking on the “Public Key” link.
6. Click on Save button to save the certificate.
Step 1b: Finding the client key
-
Search for App Manager in the setup search box
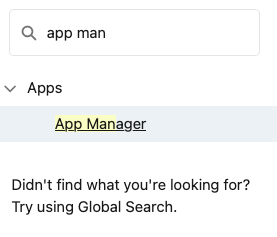
2. Select view on Goldfinger_Holdings

3. Click on Manage Consumer Details

4. After authentication this will display the consumer key that is needed on the Jira configuration “Getting Started” tab.
Step 1c: Allowing oauth access
-
Go to the service account profile
-
Search for Goldfinger_Holdings
3. Ensure the checkbox is selected and press save
Step 1d: Edit the Case Page Layout
-
Edit the page layout:
a. Drag field “Jira Issue Key” into the layout in the position you desire it to be.
b. Drag the “Sync Jira” custom link to page layout in the position you desire it to be.
c. Drag the “Link to Jira“ button on the layout in the custom buttons section.
Step 1e: Add tabs on menu bar
There are two panels the administrator can use to manage the settings for the Plum-CRM.
The Authentication Settings panel is used to configure the callback credential settings. These settings are used to push changes in Salesforce to Jira.
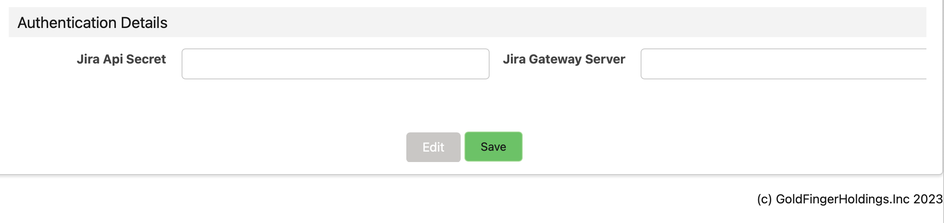
The Jira Api field must be set using the value from the below Jira configuration screen.
The Jira Gateway Server must be set to “https://crm.goldfingerholdings.onl".
The Plum-CRM Configuration Panel is used to set the automatic triggers that send modified data to Jira. Also a where clause can be entered to limit the Case records that are sent to Jira.
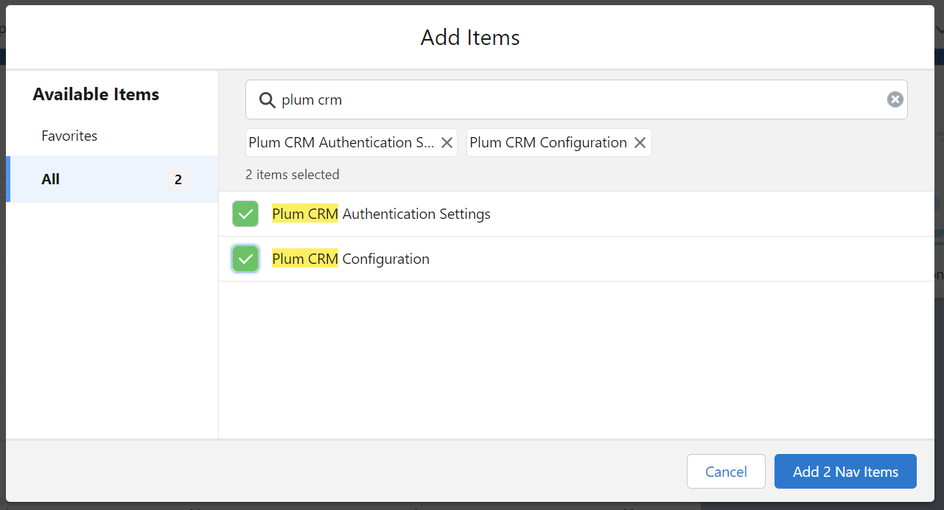
The steps to add these panels to your layout are:
-
Click on Pencil icon from top right corner:

2. Click on Add more items button:
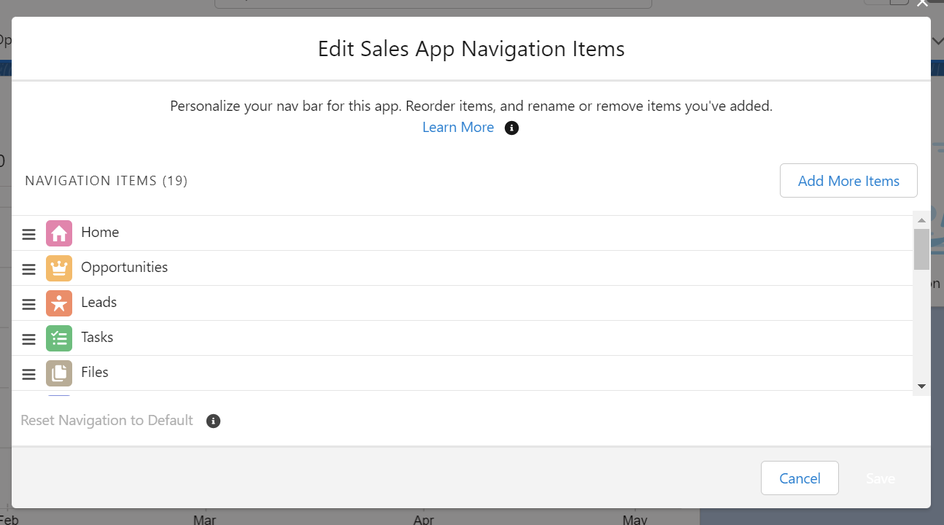
3 . Search for “Plum CRM“ and select the tabs, click on add button:
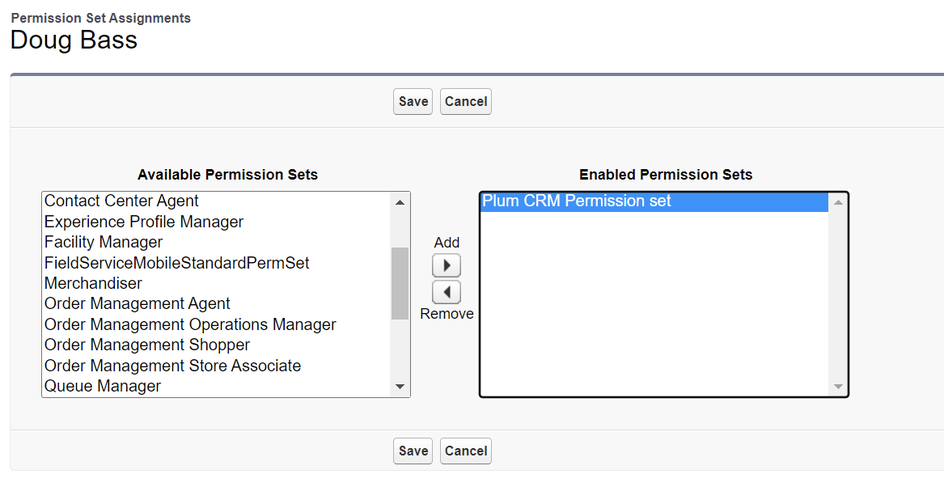
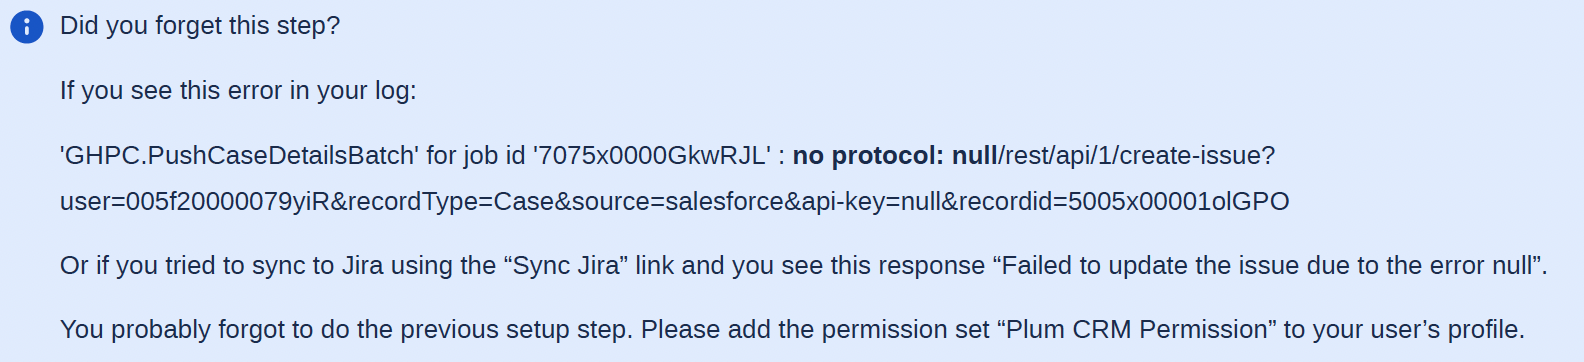
Step 1e: Add permission set to all users
Read only access must be added (via a permission set) to all users so their synchronization to Jira will work. The Admin user must provide access to our application settings to profiles or users by the following steps:
-
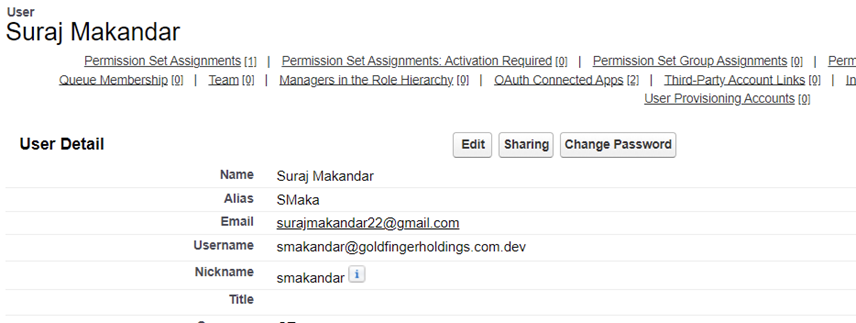
Go to the user detail page for who we want to provide access:
2. Scroll down to Permission set Assignment section and Click on Edit Assignments button under Permission set assignments

3. Select Plum CRM Permission set and add it to Enabled permission set section
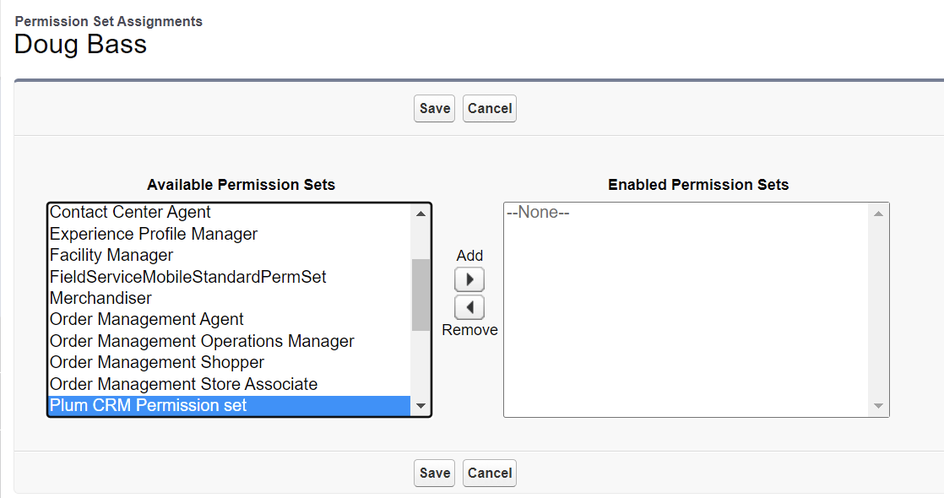
4. Click on Save button:
Providing edit access to Plum CRM Authentication Settings to profiles (optional step)
We have a tab “Plum CRM Authentication Details“ which is used to configure Jira Secret Key and URL, on new installation of package by default System Administrators will have access to this tab. If you want to provide access of this tab to some other profile other than an administrator then please follow below steps:
Provide Access to the profile
-
Go to Setup
-
Search Profiles in Quick find box

3. Open the profile you want to provide access to for ex. System Administrator
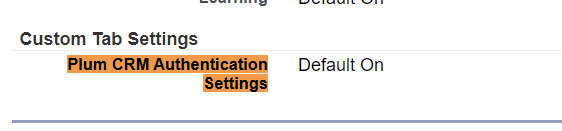
4. Click on Edit button and Search for “Custom tab Settings”
5. Make Sure Plum CRM Authentication Settings tab value is set to “
Default On”.
6. Click on the Save button.
7. If you want to provide access to another profile, repeat
steps 1 to 6.
Set profile name in Custom setting
-
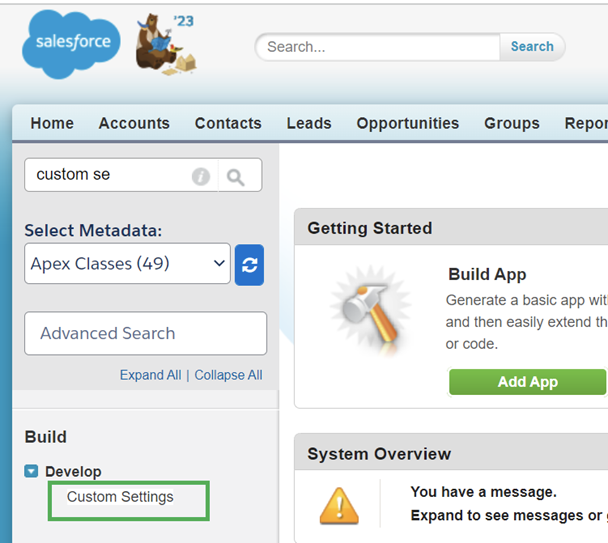
Go to Setup
-
Search for Custom Settings.

3. Click on Manage link next to Plum CRM Settings.
4. Click on Edit
5. Go to the Profile Names field and enter the name of the profile you want to provide access for ex. System Administrator.

6. Click on Save button
7. If you want to provide access to multiple profiles, then enter the comma-separated profile names.
Now all the users under that profile should have access to Plum CRM Authentication Settings tab:

Salesforce Installation Checklist
Before proceeding be sure you followed these steps:
-
Install the package for all users
-
Configure the package
-
Install the digital certificate
-
Record the consumer key for the Jira installer
-
Add the fields and buttons and links to the Case layout
-
Add the permission set to all users
-
Grant the service account access to the application
Step 2: Jira Installation
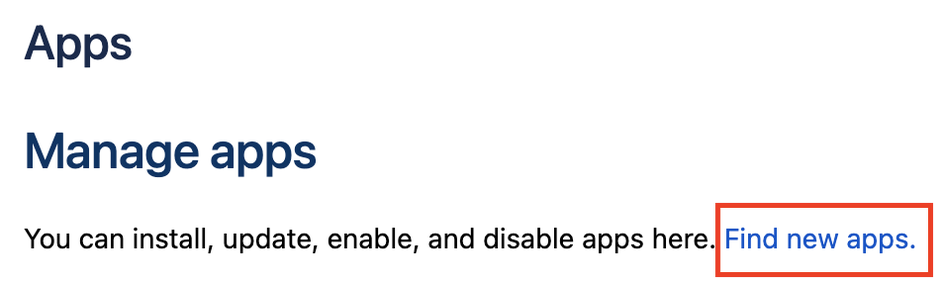
The next step is to install the application in Jira using its 'Manage Apps' features.
Step 1: Search for the CRM application using 'Find new apps'.
|
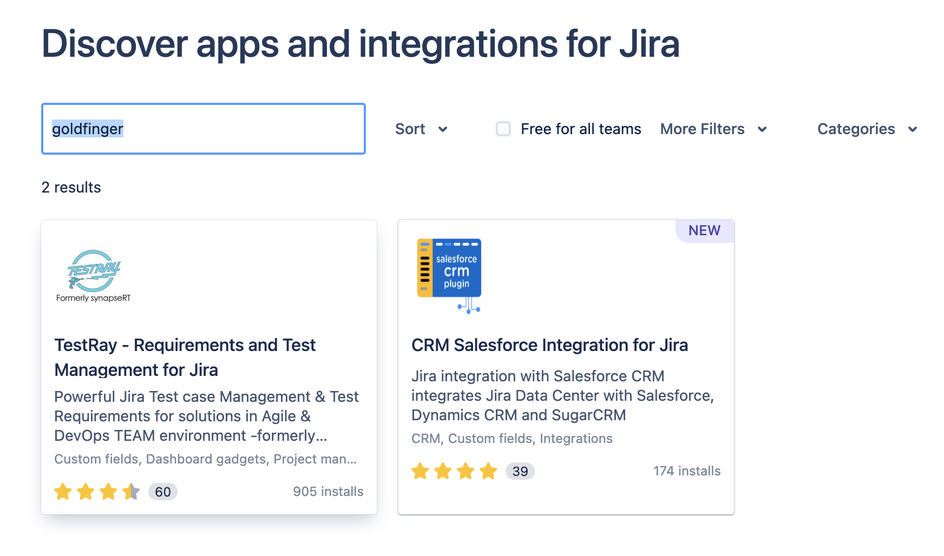
Step 2: In the search box enter Goldfinger and select the CRM application.
|
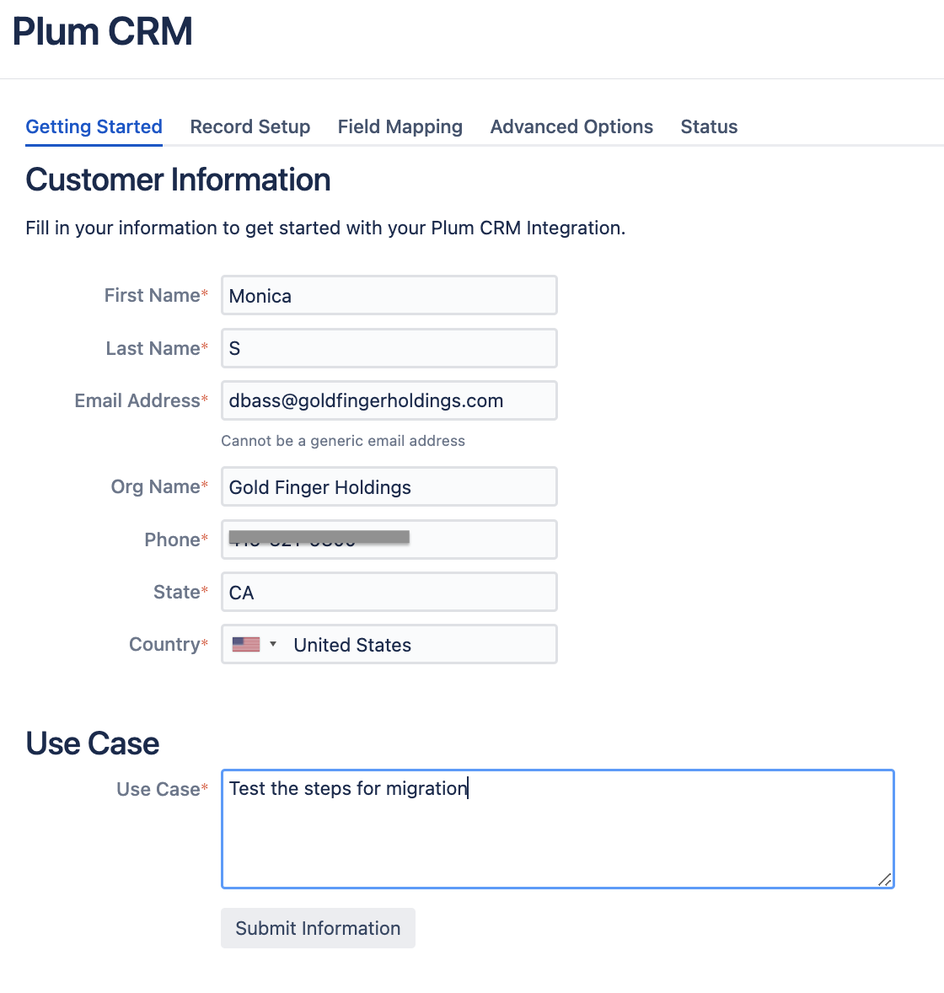
Step 3: Click on the Configure button and then enter your customer information and press “Submit Information”.
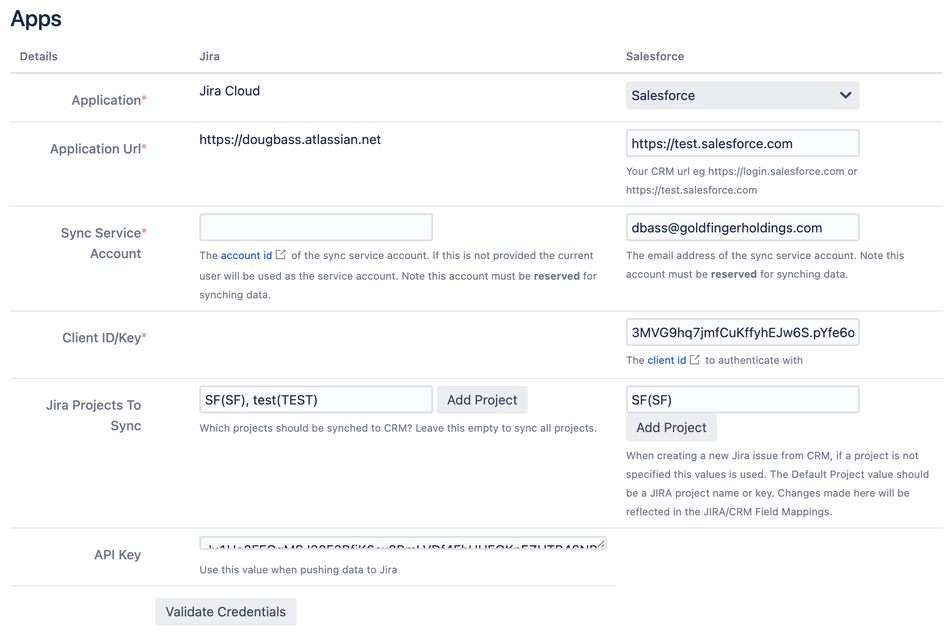
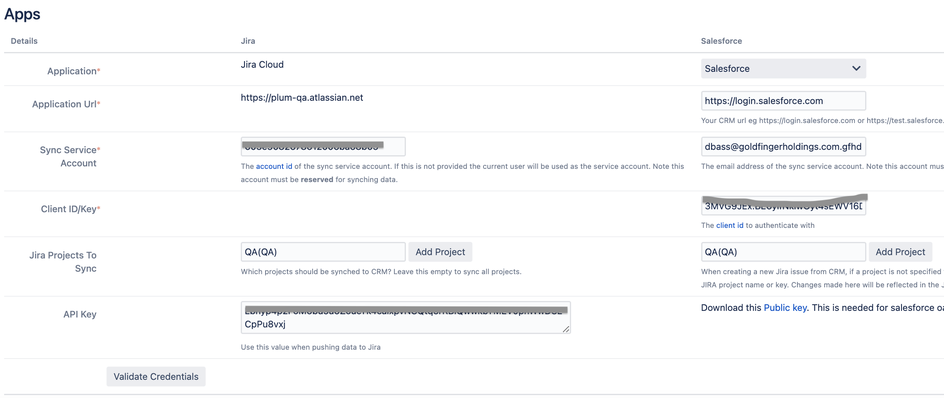
Step 4: Scroll down to the “App' section and enter your credentials to use for the synchronization of data.
|
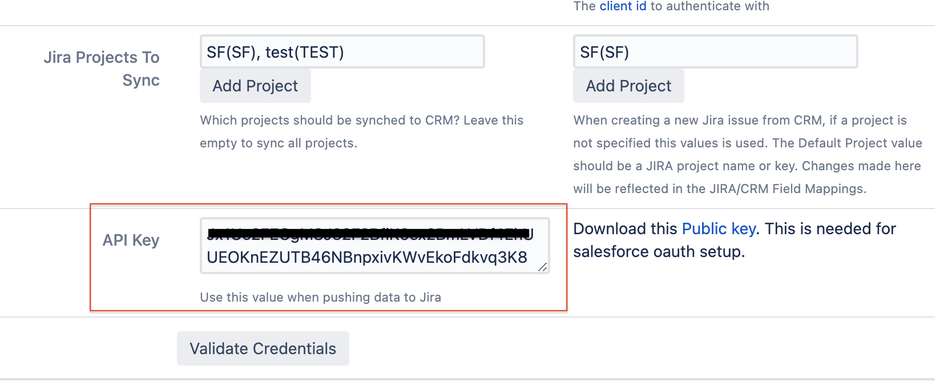
Set API Key in Salesforce
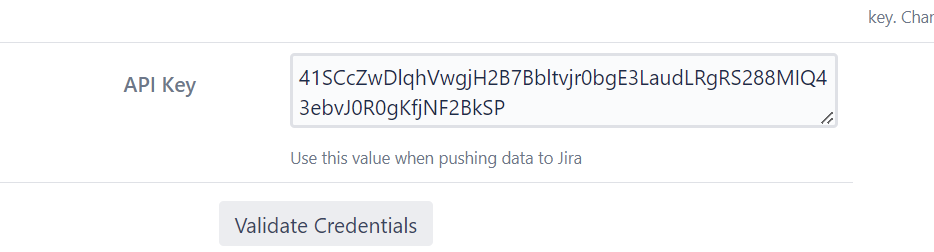
Once you install and configure Jira, “Getting Started“ tab, at the bottom you will find the API key which we need to configure into Salesforce:
Step 1: Copy the API Key from the Jira configuration screen:
Step 2: Go to Salesforce and open “Plum CRM Authentication Settings.
Step 3: Enter the copied API key into “Jira Api secret“ field and Enter Jira Gateway Server as “https://crm.goldfingerholdings.onl


We also have a 'staging environment where you can test out the latest features. If you would like to try this create a support ticket at https://goldfingerholdings.atlassian.net/servicedesk/customer/portal/27
On-premise Migration
Have you been using our CRM plugin on your Jira server? You can use the migration feature from Atlassian to migrate your Jira data from an on-premise Jira server to Jira cloud. Their is a also feature in the new Cloud CRM plugin to convert your existing data to Jira cloud.
There are two areas of CRM data migration when moving to Jira cloud. The first are your configuration settings - configuration of your records (e.g. Salesforce Cases to Jira bugs), configuration of your field mappings, and settings for comment and attachment configuration. The second is the conversion of your Salesforce data as shown in Jira such as Case, Account, and Contact information in your Jira issues and associated links to Salesforce records.
-
Migrate your Jira data to the cloud instance.
-
Install the Jira Cloud CRM plugin using the installation steps above.
-
Enter your customer information in Jira and press Submit
-
Enter your Salesforce credentials as described above and press Validate. Once the validate credentials completes successful leave this window open.
5. Now it’s decision time! You can install your record and field map settings settings using your on-premise configuration (in step 6). If you have already entered your record and field settings using the “Record Setup” and “Field Mapping” tabs you can continue to step 7 to migrate your record links.
6. If you want to automatically migrate your record and field settings from your on-premise property settings follow these steps:
a. Once “Validate Credentials” is successful press the Migrate button.
b. Enter the property settings you exported from your on-premise configurations screen and press Submit. This will install your on-premise record and field mappings. This will override any existing record and field settings.
7. Once your record and field mappings are set you can convert your existing Jira/Salesforce record links to the new Cloud format (using Jira remote issue links).
a. This migration assumes your Salesforce records contain the Jira issue key. This value in each Salesforce record will be used to create the above remote issue links in each of your Jira cloud issues).
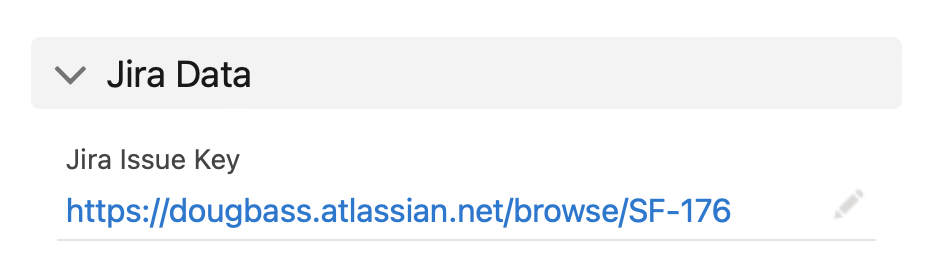
Your issue key stored in Salesforce could be a complete url (as above), or it could be just the issue key (e.g. SF-176).
b. Ensure your record map correctly specifies the field in Jira that contains the issue key.
c. Go to the advanced options tab and scroll down to the Migration section.
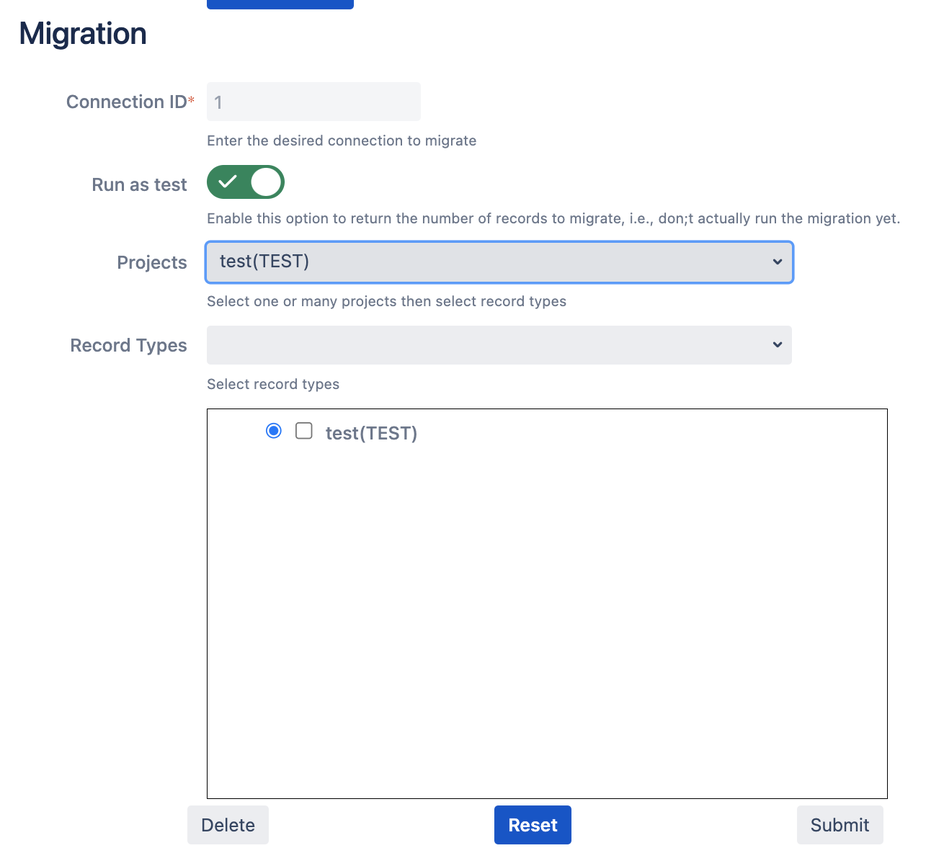
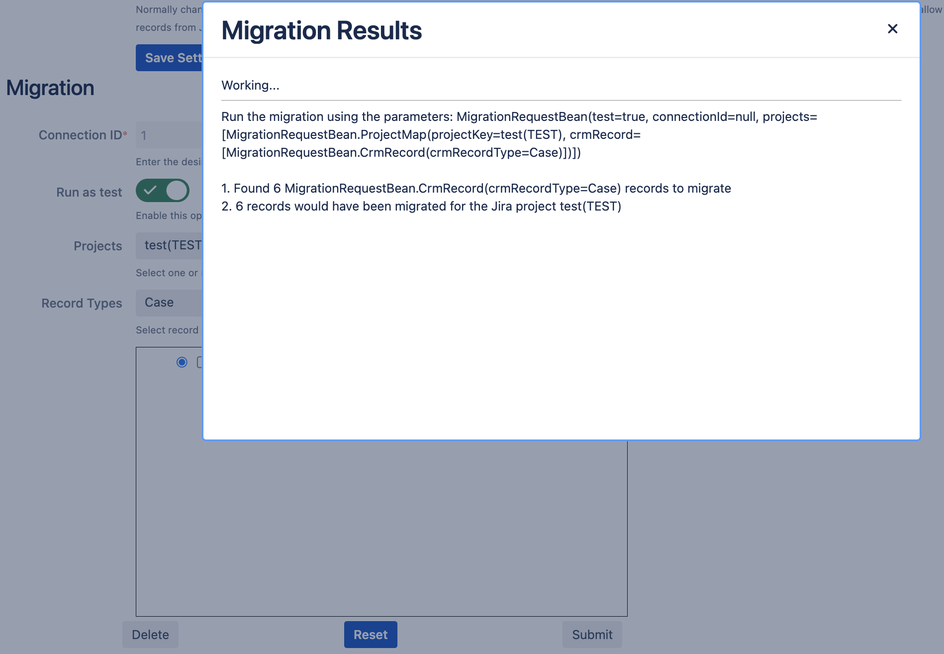
d. Select the Jira projects to migrate. We suggest you start out with a small project, and enable the , “Run as test” option. Press Submit and the response will show you how many records it will migrate.
e. Note you can add a project to the migration by selecting a project from the list. This will add the project to the box below. To delete the project from the box select the checkbox and press delete.
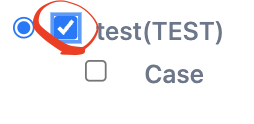
f. Likewise you can add a record type to a project. Click on a project in the box, and then select a record type in the select list. You can also delete a record type from the box using the same instructions as you did for the project.
g. Note that when migrating a project it can take some time above (2-5 seconds per migrated record).
Users Instructions
As discussed above in the Introduction there are two primary use cases - create a Case in Salesforce and sync the Case to Jira as a Bug, or create a Bug in Jira and sync the Bug to Salesforce creating a new Case.
Create a Salesforce Case from Jira
For example when you create a Bug in Jira it is automatically synchronized to Salesforce, and the Jira issue now contains a link to the Salesforce Case.
|
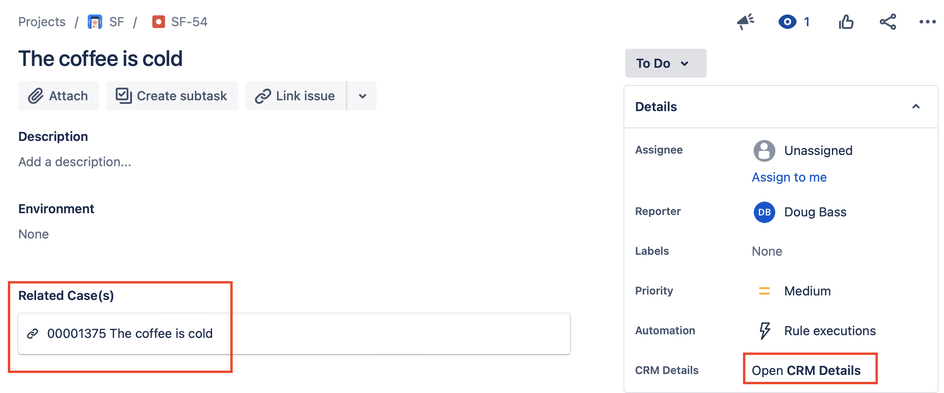
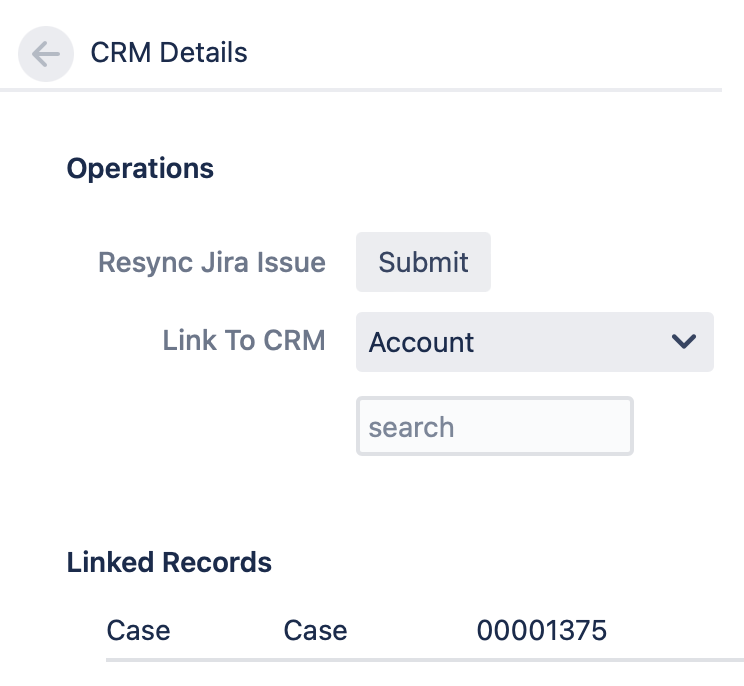
You can also click on “Open CRM Details” to see additional functions.
|
The “Resync Jira Issue” will sync the issue to Salesforce again (maybe the previous sync failed).
The “Link To CRM” allow you to lookup a record in Salesforce and link it to the Jira issue. The record could be a Case, Account, Contact, or any other type. Configuring a new record type on the “Record Setup” configuration screen will add that record type to this select list.
The “Linked Records” section will show all the Salesforce record linked to this issue. The format of the data displayed can be configured in the “Record Setup” configuration screen
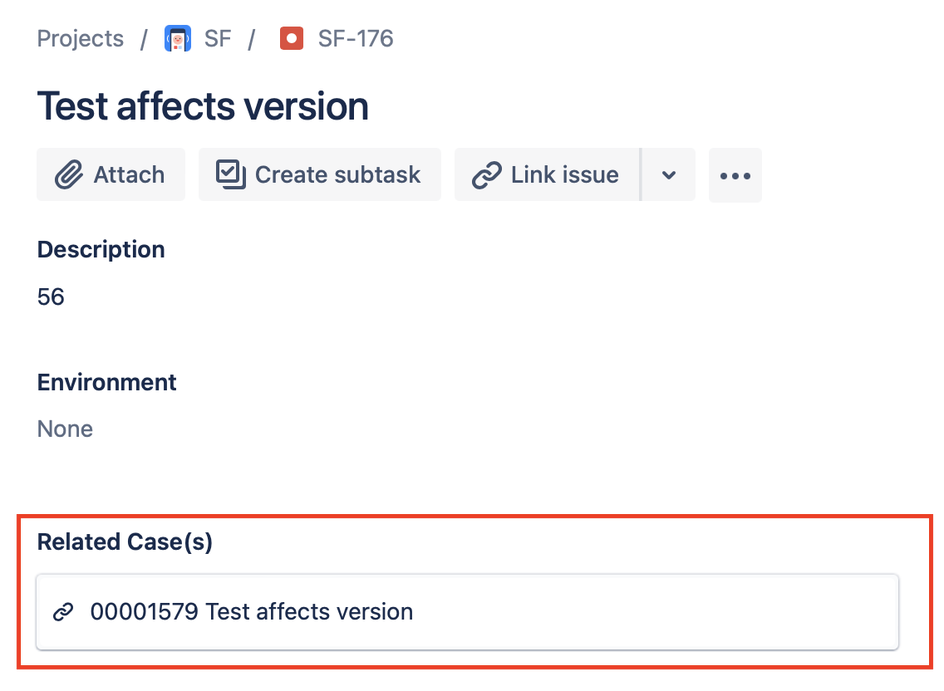
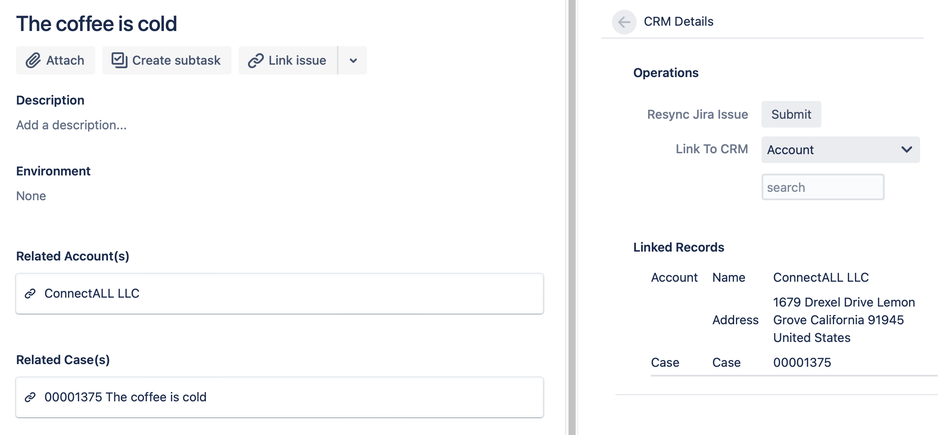
The following illustrates the result of linking an Account to the Jira Issue.
|
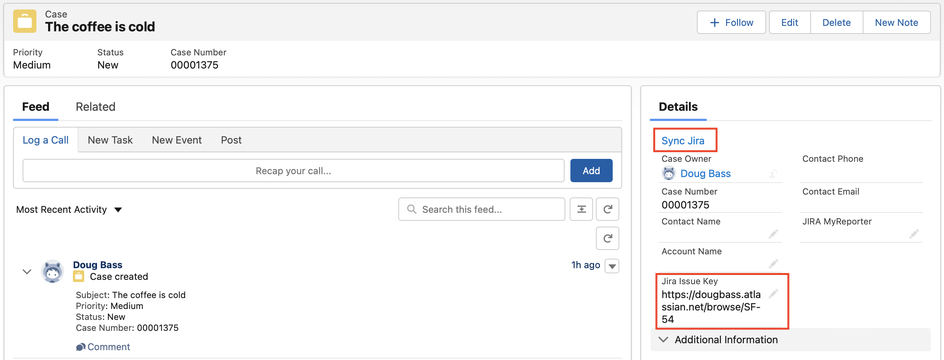
Create a Jira Issue from a Salesforce Case
A Salesforce user can also create a Jira issue by first creating a case in Salesforce. This will then create an issue in Jira - a clone of the Salesforce case. The Case can be synched to Jira automatically using a Case trigger, or manually by pressing the “Sync Jira” link.
|

Searching for issues in Jira
A Jira user might want to find all the Jira tickets linked to a specific Salesforce case, to a specific Salesforce contact, or a specific Salesforce account. This can be accomplished using the following jql queries:
|
JQL |
Purpose |
|
issue.property[crm].case=3348 |
Find all Jira issues linked to the case #3348 |
|
issue.property[crm].account ~ Acme |
Find all Jira issues linked to the account Acme |
|
issue.property[crm].contact ~ George |
Find all Jira issues linked to the contact George |
Advanced Configuration Options
The CRM Application has many configuration options though the defaults were carefully chosen to ease the initial setup. This section describes the various configuration options.
Getting Started Options
|
Option Name |
Description |
Notes |
|
Customer Information |
Person requesting the install |
|
|
Salesforce/Application |
Select Salesforce |
Support for other applications will be added in future releases |
|
Salesforce/Application Url |
Enter Salesforce Url |
|
|
Jira/Sync Service Account |
Enter the account id of the Jira service account |
If this field is empty the installer account will be used as the service account. |
|
Salesforce/Sync Service Account |
Username of Salesforce service account to sync data |
This account MUST be reserved for data sync |
|
Salesforce/Credentials |
Salesforce Client Id |
Created in the first install step described here |
|
Jira/Jira Projects To Sync |
Which projects should be synched to CRM? Leave this empty to sync all projects. |
|
|
Salesforce/Jira Projects To Sync |
Default Jira Project |
When creating a new JIRA issue from CRM, if a project is not specified this value is used. |
|
Jira/API Key |
A generated field. The api key that is used to push data from Salesforce to Jira. |
Enter this value in the Salesforce Custom Setting Authentication Detail. |
Record Setup
|
Option Name |
Description |
Notes |
|
Name |
Name to uniquely identify this CRM Record Definition |
|
|
CRM Object |
Table name in the CRM database which contains the records that JIRA issues will be linked with. |
For example, Case |
|
Jira Object |
Jira issue type which contains the record that the CRM issue will be linked with. |
For example, Bug |
|
CRM Child Object |
If you want to link multiple JIRA issues to a single CRM record you can use a CRM custom object to hold the data from all the linked JIRA issues. One or more JIRA issues will be linked to a single record in the parent object (the 'CRM Object' field) and a record will be created in this child object for each JIRA issue. |
For more information see https://doc.goldfingerholdings.com/x/_wCdAQ |
|
CRM Parent Object |
If you want to link Salesforce object like Case and Contact specify the parent record type |
For example Contact |
|
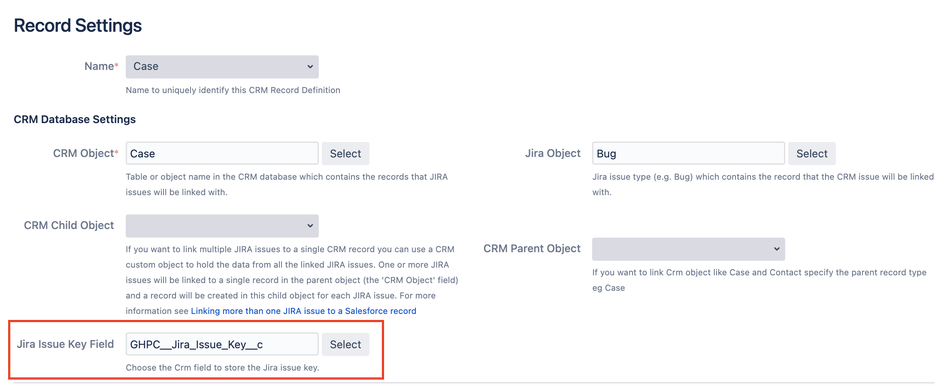
Jira Issue Key Field |
Choose the Salesforce field to store the Jira issue key |
Default is Jira_Issue_Key__c |
|
Editable By |
Jira user group permitted to change the CRM records linked to an issue. |
|
|
Viewable By |
Jira user group permitted to view the values from the linked Salesforce record |
|
|
Display Fields |
When viewing an issue in JIRA that is linked to CRM, these are the values displayed. You can specify custom screen labels by using parenthesis after each field. |
Example: "Name(Name), email_address(Email)". Display multiple fields together using square brackets. Example: "[FirstName, LastName](Name)" |
|
Name Fields |
Name of field(s) used for displaying and sorting this record. |
|
|
Search Fields |
Name of text field(s) used for searching for a CRM record. Used by the CRM search while editing an issue in JIRA. |
|
|
URL |
A URL used to link CRM info on JIRA screens to the record in the CRM system. Put CRM field names inside curly braces where you need to insert CRM values. |
For example: https://login.salesforce.com/{Id}. '{Id}' will be replaced with the appropriate CRM record id |
|
Where Clause |
A Salesforce SOQL expression used to limit the CRM records that are listed when searching for CRM records on JIRA's CRM Details screen. |
Example: Type='Prospect'. Note that the Cron Service is not affected by this setting, it has its own setting below. |
|
Issue Condition |
This feature gives you a way to automatically create a new CRM record when a specified condition is met for an issue in JIRA. A new CRM record is only created if the issue is not already linked to a CRM record of this type and the issue meets the condition specified here. |
The JQL Picker is used to help the user create a valid JQL and see the search results |
|
Sync Jira Comments To CRM |
Always, Sometimes, Never |
If set to Sometimes the comment will be synched if the comment body contains the tag #crm |
|
Sync Comments As |
Chatter or Case Comments |
|
|
Sync Comments As |
Private or Public |
|
|
Delete Jira Comments When CRM Comment Is Deleted |
Yes or No |
|
|
Comment Title |
An optional title for comments sent to CRM. The tokens {FULLNAME}, {DATETIME}, and {KEY} may be added to the title. |
|
|
Sync CRM Comments To Jira |
Always, Sometimes, Never |
If set to Sometimes the comment will be synched if the comment body contains the tag #jira |
|
Delete Jira Comments When CRM Comment Is Deleted |
Yes or No |
|
|
Delete Private CRM Comment After Its Synched To Jira |
Yes or No |
|
|
Comment Title |
An optional title for comments sent to Jira. The tokens {FULLNAME} and {DATETIME} may be added to the title. |
|
|
Sync Jira Attachments To CRM |
Always, Never |
|
|
Sync Attachments To |
|
“Sub Record Attachments” can be used when One Crm To Many Jira is on. |
|
Delete Synched Attachments |
Yes or No |
Should the CRM attachment be deleted when the related Jira attachment is deleted |
|
Sync Attachments To Jira |
Always or Never |
|
|
Delete Synched Attachments |
Yes or No |
Should the Jira attachment be deleted when the related CRM attachment is deleted |
Field Mapping Options
The Field Mapping configuration shows the fields that will be f.
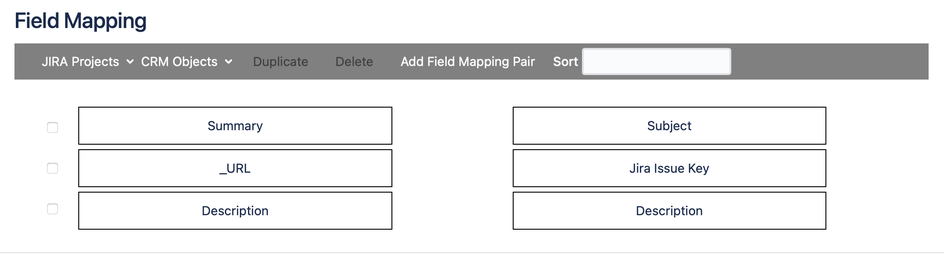
Clicking on any Jira field (e.g. Summary) will display the edit screen where the desired fields to map can be selected.
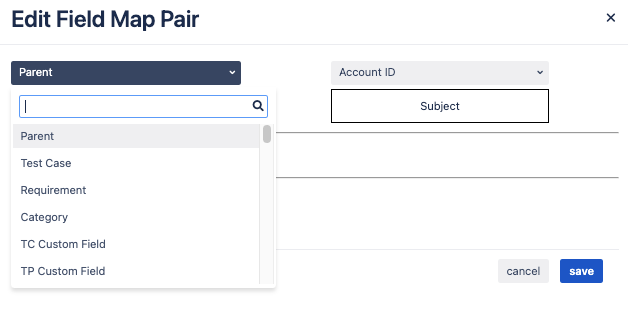
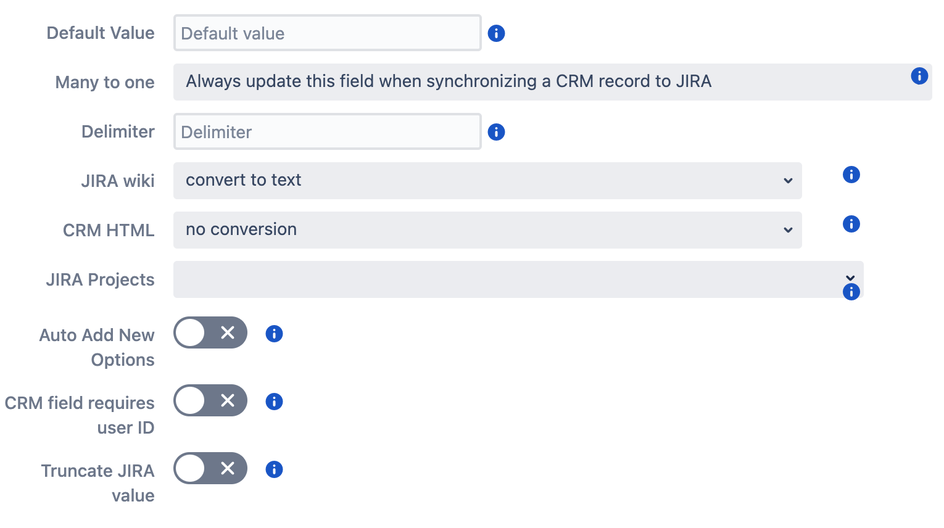
Field Mapping Advanced Options

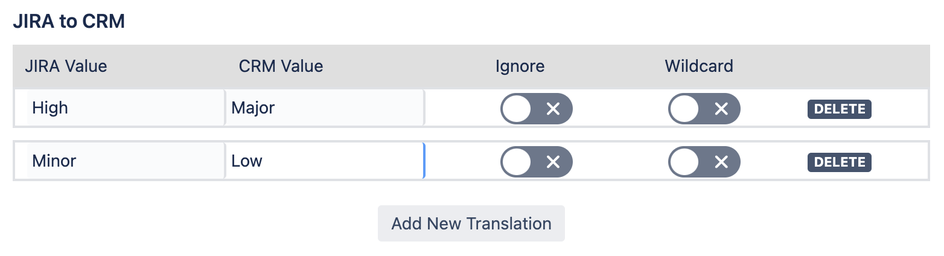
Field Mapping Value Translation
Field values can be mapped to different values.
Frequently Asked Questions
Setup trigger on Custom object
To sync a custom object with Jira we have to set up a trigger on the custom object, please follow the below steps to setup the trigger:
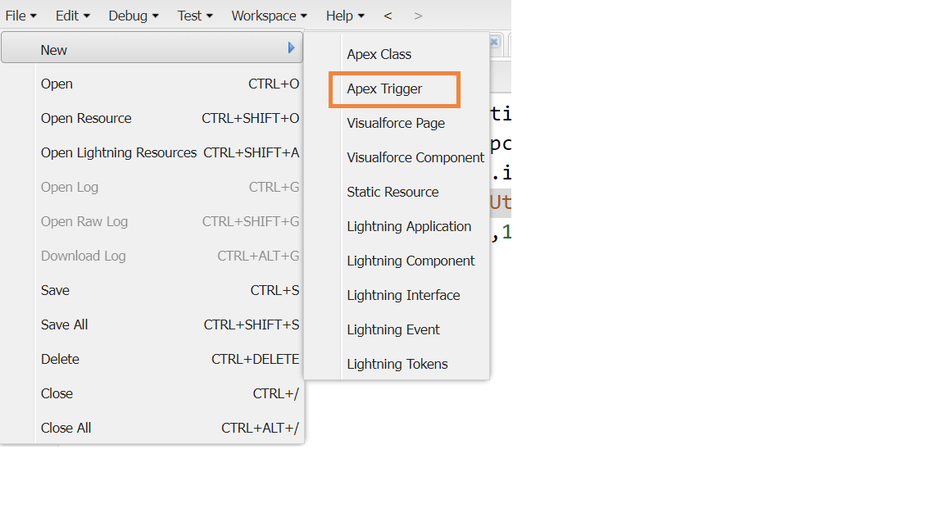
Step 1: Open Developer Console
Step 2: Go to File => New => Apex Trigger
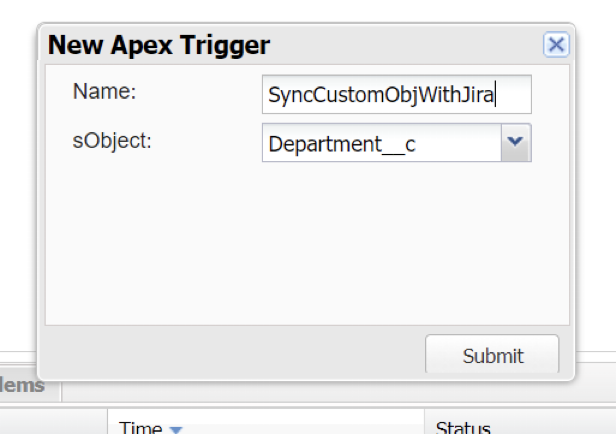
Step 3: Enter any name for the trigger and select the name of custom object you want to sync:
Step 4: Copy and paste the below code inside your trigger and save it.
GHPC.ProcessCustomObject pc = new GHPC.ProcessCustomObject();
pc.sObjectList = trigger.isDelete?trigger.old:trigger.new;
database.executeBatch(pc,10);
Note: By default, the trigger will work on “after insert” event, to make trigger work on the Update event just add “after update” keyword for ex:
trigger SyncCustomObjWithJira on GHPC__GFH_Options__c (after insert,after update) {