
To make synapseRT NextGen fits your team/project well, we provide some configuration items for your chosen.
Please note that you need JIRA Administrator permission to do any modifications.
Configuration
SynapseRT Issues
You are allowed to map other issues types as synapseRT NextGen Requirement and Bug issue types. Once mapping is done, the mapped issue type will get the extensions from the synapseRT NextGen plugin.
To map other issue types, follow these steps:
-
Click "Administration->Add-ons" from the main menu
-
Click the "Configuration" link from the left panel under the "SYNAPSERT" section
-
Select the issue types that you want to map for Requirement and Bug
-
Click "Save" button.
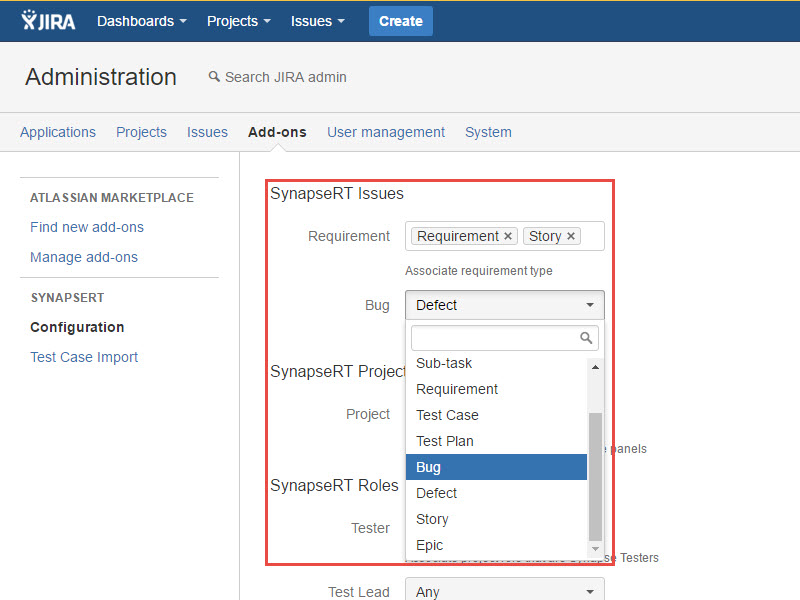
[Screenshot - UG_AD01_Configure_SynapseRT_Issues]
SynapseRT Projects
You are allowed to enable/disable synapseRT NextGen plugin for your JIRA projects.
synapseRT NextGen panels are visible to projects with the plugin enabled.
To enable it for your projects, follow these steps:
-
Click "Administration->Add-ons" from the main menu
-
Click the "Configuration" link from the left panel under the "SYNAPSERT" section
-
Move to "SynapseRT Projects" section
-
Choose projects from "Project" list
-
Click "Save" button
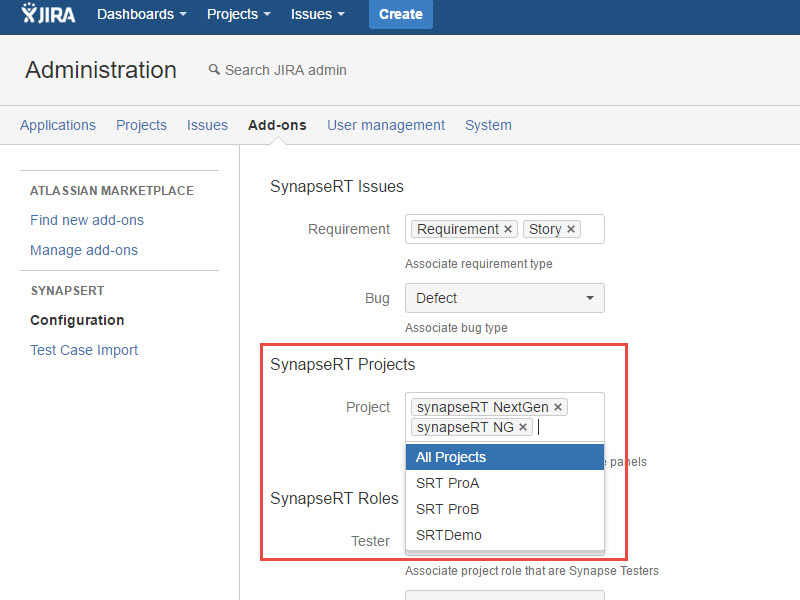
[Screenshot - UG_AD02_Configure_SynapseRT_Projects]
SynapseRT Roles
synapseRT NextGen provides two kinds of roles, "Tester" and "Test Lead". You can map your own project roles to synapseRT Roles to make users can act as a "Tester" or "Test Lead".
To map project roles to synapseRT Roles, follow these steps:
-
Click "Administration->Add-ons" from the main menu
-
Click the "Configuration" link from the left panel under the "SYNAPSERT" section
-
Move to "synapseRT Roles" section
-
Choose your project role for "Tester" and "Test Lead"
-
Click "Save" button
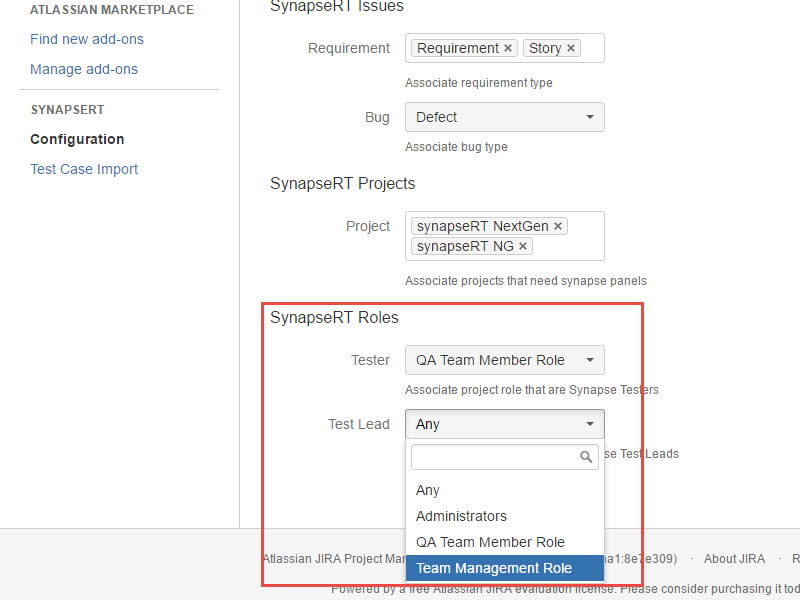
[Screenshot - UG_AD03_Configure_SynapseRT_Roles]
Permission table:
|
Area |
Permission |
Roles |
||
|---|---|---|---|---|
|
Test Lead |
Tester |
Other |
||
|
Requirement |
'Create' or 'Link parent/child in 'Requirements' panel |
√ |
√ |
X |
|
'Delete' relationship in 'Requirements' panel |
√ |
√ |
X |
|
|
'Requirement Tree' button in "Requirements' pane |
√ |
√ |
√ |
|
|
'Create' or 'Link' Test Case in 'Test Cases' panel |
√ |
√ |
X |
|
|
'Delete' relationship in 'Test Cases' panel |
√ |
√ |
X |
|
|
'View Bugs" button in 'Test Cases' panel |
√ |
√ |
√ |
|
|
Test Case |
Create/Edit/Move/Delete test steps |
√ |
√ |
X |
|
Import test steps |
√ |
√ |
X |
|
|
Export test steps |
√ |
√ |
√ |
|
|
Add/Delect requirment link |
√ |
√ |
X |
|
|
Add/Remove test suite |
√ |
√ |
X |
|
|
Test Plan |
Add/Delete/Move test case member from 'Test Case' panel |
√ |
X |
X |
|
Modify "Tester" information from 'Test Case" panel |
√ |
X |
X |
|
|
Add test cycle |
√ |
X |
X |
|
|
Test cycle 'Edit' & Workflow operations |
√ |
X |
X |
|
|
Test Cycle Page |
Bulk Operation & Actions 1 - Assign |
√ |
√ |
X |
|
Bulk Operation & Actions 2 - Execution |
√ |
√ |
X |
|
|
Modify 'Tester' information |
√ |
X |
X |
|
|
Modify 'Result" information |
√ |
√ |
X |
|
|
'<Prev' and 'Next >' buttons |
√ |
√ |
√ |
|
|
'Defects' link |
√ |
√ |
√ |
|
|
'Attachment' link |
√ |
√ |
√ |
|
|
'Search' box |
√ |
√ |
√ |
|
|
Test Case Run Dialog |
Modify 'Result' |
√ |
√ |
X |
|
Create/Link bugs |
√ |
√ |
X |
|
|
Modify 'Comments' |
√ |
√ |
X |
|
|
Modify test step result and actual result |
√ |
√ |
X |
|
|
Create/link bugs to test step |
√ |
√ |
X |
|
|
Add/Delete attachment to test step |
√ |
√ |
X |
|
|
Add/Delete attachment to test case run |
√ |
√ |
X |
|
|
'Previous' and 'Next' buttons |
√ |
√ |
√ |
|
|
Test Suites Panel |
Add/Edit/Move/Delete/Disable/Enable test suite |
√ |
√ |
X |
|
Add/Edit/Delete label |
√ |
√ |
X |
|
|
'Add Test Case' to a test suite |
√ |
√ |
X |
|
|
'Link Test Case' to a test suite |
√ |
√ |
X |
|
|
Delete a test case from a test suite |
√ |
√ |
X |
|
|
Move a test case to different location |
√ |
√ |
X |
|
|
Move a test suite to different location |
√ |
√ |
X |
|
|
Delete a test suite |
√ |
√ |
X |
|
|
Test Plans Panel |
All Actions |
√ |
√ |
√ |
|
Traceability Panel |
All Actions |
√ |
√ |
√ |
|
SynapseRT Report Panel |
All Actions |
√ |
√ |
√ |
|
Gadget Panel |
All Actions |
√ |
√ |
√ |
Test Case Import
You can import test cases from .csv file.
Points to remember while importing Test Cases:
-
Fields supported (in any order): ISSUE KEY,SUMMARY,DESCRIPTION,STEP#1,EXPECTED RESULT#1,STEP#2,EXPECTED RESULT#2 ...
-
SUMMARY is mandatory and others are optional. Optional fields can be ignored altogether
-
Make sure the headers are in CAPITAL letters
-
Steps and Expected Results should count like STEP#1,EXPECTED RESULT#1,STEP#2,EXPECTED RESULT#2 etc.,
-
Providing ISSUE KEY will update the corresponding Issue, if found. It will update Summary, Description and add the steps provided.
To import test cases from .csv file, follow these steps:
-
Click "Administration->Add-ons" from the main menu
-
Click the "Test Case Import" link from the left panel under the "SYNAPSERT" section
-
Choose a project from "Project" dropdown and click "Next" button
-
Click "Choose Files" button, browse to your test case file (.csv format)
-
Click "Next" button
[Screenshot - UG_AD04_Test_Case_Import]
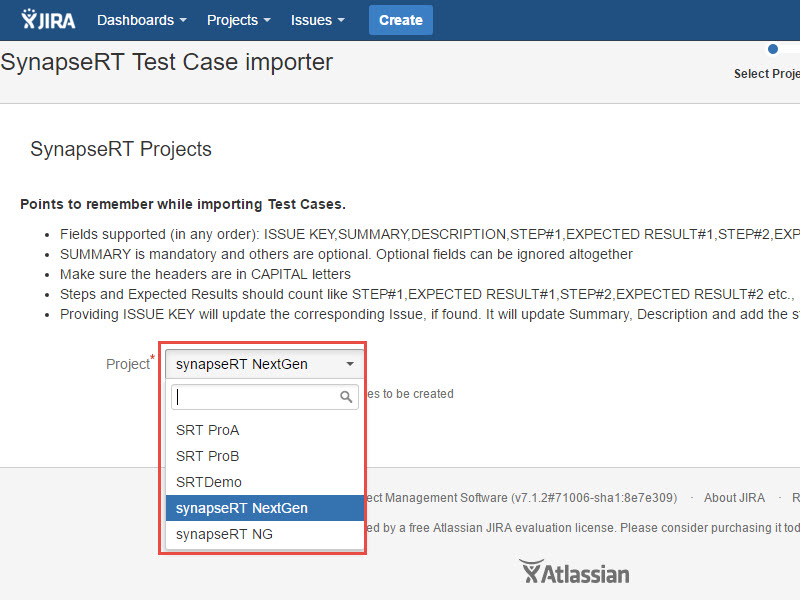
[Screenshot - UG_AD05_Test_Case_Import]
As we improved usability of test case import format since release 8.1.2, please find below test case import sample files for different versions:
-
Import sample file for 8.1 and 8.1.1: Test_Case_Import_Sample_File_for_8.1&8.1.1.csv
-
Import sample file for 8.1.2 and higher: Test_Case_Import_Sample_File_for_8.1.2&Newer.csv