Import Test Cases to a JIRA Project
You can import Test Cases (.csv) to a JIRA project from "Test Suites" page.
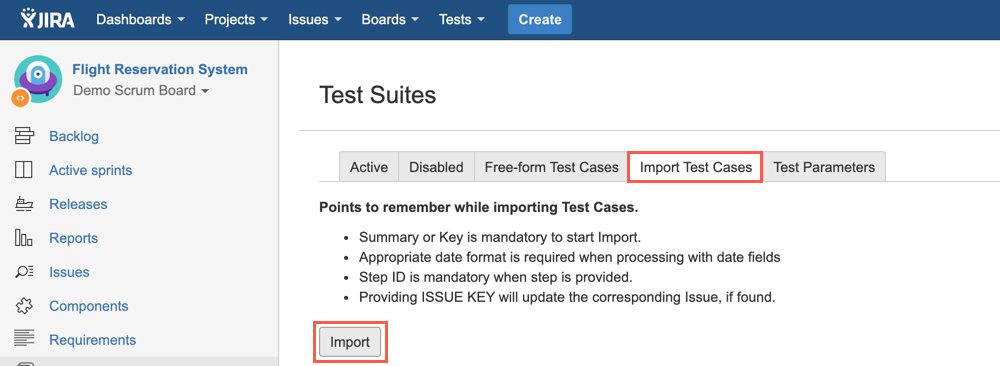
Points to remember while importing Test Cases:
- Summary is mandatory to start the import.
- Appropriate date format is required when processing with date fields.
- Use the syntax that complies with the Java SimpleDateFormat
- Example: set date format to yyyy-MM-dd h:mm a if you are going to import date time value as 2030-01-01 12:00 AM
- Step ID is mandatory when a step is provided.
- Providing ISSUE KEY will update the corresponding issue, if found.
- Specify Requirement ID in Requirement column if you want to import Test Cases with Requirement associations.
Note: if Requirement ID specified in import file cannot be found in your project, the Test Case will still be imported without Requirement associations. - Specify Test Suite path in Test Suite column if you want to import Test Cases with Test Suite associations.
Note: If Test Suite path specified in import file cannot be found from your project, it will be created from import file. - At the end of the CSV file import wizard, you will be given the option of creating a CSV configuration file, which contains the settings you configured while running through the CSV file import wizard. This is useful if you need to test your CSV file import on a test JIRA server first before performing the import on a production system.
To import test Test Cases from a .csv file to a JIRA project, follow these steps:
- Click the "Import Test Cases" tab from "Test Suites" page.
- Click the "Import" button.
- Click "Choose Files" button, browse to your test case file (.csv format).
- Specify a "Delimiter" if necessary.
- Select "Use an existing configuration file" if you have, it will ask you to select the configuration file and mappings in the file will be loaded automatically in next page.
- Click "Next" button.
- Select the CSV fields to import, then set how you would like these converted to fields in JIRA.
- Note: the field mapping can be done automatically if you have a configuration file created in your previous import and follow step 5.
- Click "Import" button.
Note:
If you need to import another CSV file with the same (or similar) settings to what you used through this procedure, click the save the configuration link to download a CSV configuration file, which you can use at the fifth step of the CSV file import wizard.
[Screenshot - UG0044_Test_Suite_Panel_Import_Test_Case]
Tips for importing CSV data into JIRA fields
Below are some helpful tips when importing data from your CSV file into specific JIRA system fields and user created custom fields:
| Jira Field | Import Notes |
|---|---|
| - | synapseRT import only supports Jira system field (e.g. Summary, Priority ...) and custom fields from Jira standard field types (e.g. Checkboxes, Date Picker ...) Jira advanced field types (e.g. Development Summary, Global Rank ...) and any field types from third party apps are not supported. |
| Summary | This is the only required field. |
| Issue Key | You can set the issue key for an imported issue. If an issue with a given key already exists in JIRA, it will be updated instead. |
| Component(s) | You can import issues with multiple components by entering each component in a separate column. |
| Affects Version(s) | You can import issues with multiple 'Affects Versions' by entering each version in a separate column. |
| Fix Version(s) | You can import issues with multiple 'Fix Versions' by entering each version in a separate column. |
| Due Date |
|
| Labels | You can import issues with multiple labels by entering each component in a separate column. |
| Epic Link | Provide Epic issue key if you want to link issues to an existing Epic in Jira. |
Custom field types:
|
|
Custom field types:
|
Example: |
Custom field types:
|
|
Custom field type:
|
Example: |
Custom field type:
|
|
Downloadable examples
- Total of three Test Cases along with folder structure (Test Suite) and several Jira standard fields, comma (,) delimited: Test Case Import Sample File.csv; field mapping file: Test Case Import Configuration.txt
- Total of three Test Cases along with folder structure (Test Suite) and all Jira standard custom fields, comma (,) delimited, date format set to dd/MMM/yy h:mm a: Test Case Import Sample File with Jira Standard Custom Fields.csv; field mapping file: Test Case Import with Jira Standard Custom Fields Configuration.txt